In order to identify the database logger files in your CIMPLICITY project, you specify the source of both the primary server and secondary server database logger files in the CIMPLICITY Logging Properties dialog box located on the primary server.
Click Project on the Workbench menu bar.
Select Properties.
The Project Properties dialog box opens.
Select the Settings tab.
Select Database Logger.
Click Settings.
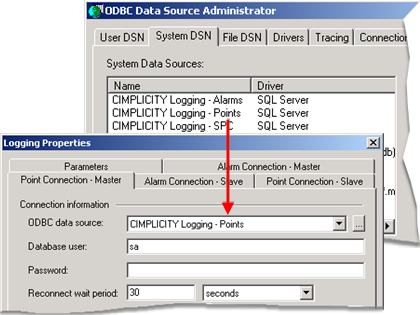
The Logging Properties dialog box opens:
Select the Point Connection - Master tab.
Fill in the fields in the Logging Properties dialog box as follows.
|
Field |
Description |
|
|
ODBC data source |
The data source for the server from the drop down list of available data sources. Tip: Click the ODBC Data Source button to the right of the ODBC data source field to open the ODBC Data Source Administrator dialog box. You can then see the drivers configured for each data source and make any necessary changes or additions. |
|
|
Database user |
(Required if you are connecting to a SQL Server) user who has the privilege to connect to the selected database driver. |
|
|
Password |
(Required if you are connecting to a SQL Server) needed to connect to the selected database driver. |
|
|
Reconnect wait period |
Amount of time the Database Logger waits between reconnect attempts when the connection to the database is lost in the. Enter a value between 0 seconds (continuous retries) and 24 hours. The default is 30 seconds. |
|
|
Enable Store and Forward |
Checked enables Store and Forward. After you enable the feature, check one of the following. |
|
|
|
Unlimited |
Database Logger stores an unlimited number of records while its connection to the database is down. The number of records actually stored is determined by the amount of time the connection is lost and by the amount of free disk space you have. |
|
|
Max number of stored records |
Database Logger stores a specified number of records when its connection to the database is down. Enter a number between 1 and 4,294,967,295. |
Repeat these steps for the other three tabs so you will have configured all four tabs:
|
Tab |
Server |
|
|
Point Connection |
Master |
Primary (master) |
|
Point Connection |
Slave |
Second (slave) |
|
Alarm Connection |
Master |
Primary |
|
Alarm Connection |
Slave |
Second |
Click or select the Parameters tab.
Result: CIMPLICITY validates your entries. If the Data Logger is unable to connect to the selected database, validation fails.
![]() Important: On each tab, make sure that
you select the correct data source for the computer (master /
slave) that the tab represents.
Important: On each tab, make sure that
you select the correct data source for the computer (master /
slave) that the tab represents.
|
Configure a Service for Creating Logging Tables Dynamically Triggered by an Event. |
|
|
Guidelines and Notes about Specific Data Sources |
|
|
Database logging configuration. |