Click Advanced.
Advanced fields display in the middle of the PRT Region Configuration dialog box.
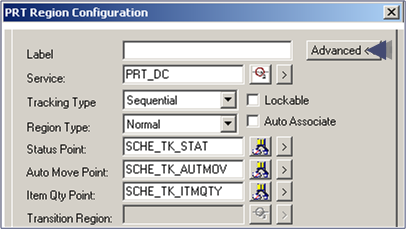
Note: Default points are automatically filled in based on region ID.
Configure the advanced fields, as follows.
|
Field |
Description |
|
Label |
Enter text in the field that will display with the region and provide user recognition. |
|
Service |
Enter a name for the PRT Service that will manage this region. Note: PRT_DC is the default. |
|
Tracking Type |
Select a (primary region type) as follows:
|
|
Region Type |
Select a (secondary region type) as follows:
|
|
Lockable |
Check to lock the region. Guidelines: In order to make modifications to the region, and to be able to move items into the region, it must be locked. By checking the Lockable box, you enable this functionality. |
|
Auto Associate |
Check to enable parent-child association between a serialized and non-serialized item. Note: Must be a Combine region type. |
|
Status Point |
Enter the point ID in the field that will represent the region's status. Point must be a DIUNT type. Note: A default point ID is inserted in the next 3 fields to help standardize point IDs in your database. |
|
Auto Move Point |
Enter the point ID in the field that will display when an item moves into the region due to a point-based move. Point must be a text point of no more than 55 characters. The point should contain the item ID and other optional information depending on the value of the num_setpt_param in the global parameter files. |
|
Item Qty Point |
Enter the point ID In the field that will display the total number of items contained in the region. Point must be of type INT or UINT. |
|
Transition Region |
(For a shifting region) Enter an ID for the Transition region. Note: When the items shift locations the item at the head location is moved to the shifting transition region specified here. |
![]() Tip: The Status, Auto Move and Item Qty
points will be automatically configured for you using default
values upon exiting the wizard. Click Yes in the message box for automatic
point configuration to occur.
Tip: The Status, Auto Move and Item Qty
points will be automatically configured for you using default
values upon exiting the wizard. Click Yes in the message box for automatic
point configuration to occur.
![]() Step 3. Configure regions.
Step 3. Configure regions.