Click the Logging tab in the PRT Configuration dialog box.
Check Master Logging Enable to activate logging options.
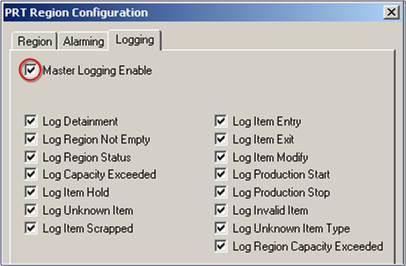
In the logging options group, check boxes to enable logging as needed for your Tracking Model:
|
Logging Option |
Enables logging when… |
|
Log Detainment |
Items are moved to the detainment region. |
|
Log Region Not Empty |
A Disperse region is not empty and new items have arrived. |
|
Log Region Status |
An Item enters an 'in-locked' region or exits an 'out-locked' region. |
|
Log Capacity Exceeded |
The number of items at a single region location exceeds the configured maximum. |
|
Log Item Hold |
An Item enters a region with an attribute that matches an item-hold specification. |
|
Log Unknown Item |
Information cannot be retrieved for a serialized item. |
|
Log Item Scrapped |
An item has been scrapped (deleted) from the region's queue. |
|
Log Item Entry |
An item is entered into the region's queue. |
|
Log Item Exit |
An item exits the region's queue. |
|
Log Item Modify |
An item's tracking data is modified. |
|
Log Production Start |
Item tracking starts in this region. |
|
Log Production Stop |
Items tracking stops in this region. |
|
Log Invalid Item |
An invalid item type enters the region. |
|
Log Unknown Item Type |
An unknown item type enters the region. |
|
Log Region Capacity |
The region capacity has exceeded its configured |
|
Exceeded |
Maximum. |
Click OK.
The region, which is listed in the Region dialog box, is added to the Tracking Model configuration.
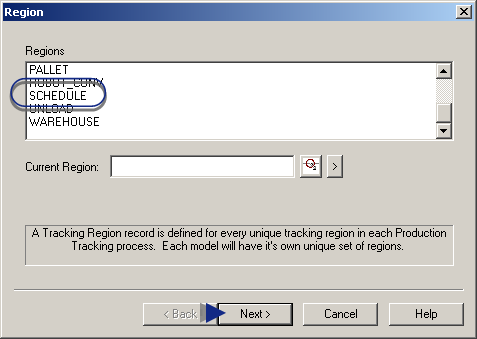
Repeat the tasks in Step 3 to configure at least two regions.
Click Next when you have finished configuring regions.
Result: The Route dialog box displays.
![]() Note: You can also set alarming and
logging options in the RCO_UI.
Note: You can also set alarming and
logging options in the RCO_UI.
In the RCO_UI,alarming and logging are affected dynamically, but are not stored in the database.
![]() Step 3. Configure regions.
Step 3. Configure regions.