|
Important Notes before creating a TADB Database |
|
|
Create a TADB Database Procedure |
Important Note Before Creating a TADB Database
This procedure needs to be done on SQL Servers where Tracker Query is going to be installed or upgraded, including both nodes of a cluster, and also on a Historical TADB server.
Tracker Query requires a file, mfc90.dll, in order to operate correctly.
Important: Mfc90.dll must be installed before Proficy CIMPLICITY is installed.
Do the following.
Insert the Proficy CIMPLICITY CD in the CD drive on the SQL Server server.
Expand ...\Setup\Microsoft\VisualStudio.
Double-click vcredist_x86.exe
Follow any installation instructions.
Result: The required file will be installed.
Note: You can also search for vcredist_x86.exe at the Microsoft Web site.
Mfc90.dll is installed automatically on machines where CIMPLICITY is installed.
Create a TADB Database Procedure
Note: If you used the Wizard to create a POMS project this step is completed. However, you can also follow all of these steps or start with 3 in this step, if you want to create and assign or assign a different existing TADB database from the one you assigned when you used the Wizard.
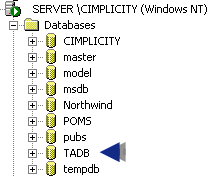
Create a new database in the SQL Server that will be used for the TADB.
Open the TrackerCfg_UI in an existing project.
Note: The project can be on any node.
If this is the first time you open the TrackerCfg_UI, an Options dialog box displays, in which you select the RCO database.
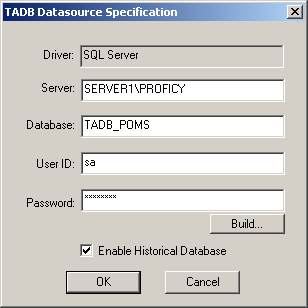
Once you have selected the RCO database, a TADB Datasource Specification dialog box opens.
Fill in the fields, as follows.
|
Field |
Description |
|
Driver |
SQL Server. |
|
Server |
Name of the server that has the database. |
|
Database |
Database that was created in the SQL Enterprise |
|
User ID |
User who has access to the database. |
|
Password |
Required to access the database. |
|
Build |
Opens Data Link Properties dialog box, in which you can find or set up the server if it is not already set up. Note: Microsoft help is available for your configuration. |
|
For an Enterprise edition or Standard edition of Microsoft SQL Server only. |
Click .
Tracker searches for and connects to the database.
Actions in the remainder of this step depend on the status of the connected database.
|
The database is not an established TADB or Query Engine database. |
|
|
The database is an existing TADB database with data. |
The database is not an established TADB or Query Engine database.
The following messages display.
The current database...is not a TADB database. Do you want to create one now?
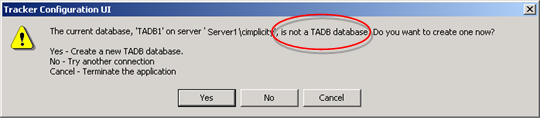
Click to create the selected database as a TADB database.
The current database...is not a Query Engine database. Do you want to create one now?

Click to create the selected database as a Query Engine database.
A Configuration Login dialog box opens.
Enter a user name and password that has privileges to configure Tracker.

Click .
Result: The TrackerCfg_UI window becomes available for configuration.
The database is an existing TADB database with data.
Click the
button ![]() on the TrackerCfg_UI
toolbar to save the configuration.
on the TrackerCfg_UI
toolbar to save the configuration.
Close the TrackerCfg_UI.
Click the button ![]() on the Workbench toolbar.
on the Workbench toolbar.
Re-open the TrackerCfg_UI.
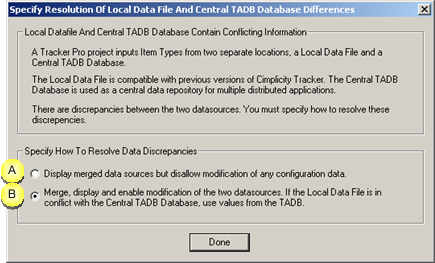
If data has been imported into the TADB database a message displays.
Options are:
|
A |
Does not allow you to modify the TADB database. |
|
|
If you choose this option, this message will display every time you open the TrackerCfg_UI until the PRT Item Types configuration is the same as the configuration in the SQL database. |
|
B |
Updates the data in PRT Item Types. TADB configuration is used if there is a conflict or differences. |
Check (B) Merge display and enable modification...to update PRT Item Types with the TADB configuration.
Click .
Select PRT>Advanced>Item Types in the TrackerCfg_UI left pane.
Result: The TADB meta data categories display in the TrackerCfg_UI PRT>Advanced>Item Types right pane.
|
|
1. TADB enabled. |