Ranges include:
![]() One or more locations in
One or more locations in
![]() One or more regions in
One or more regions in
![]() Any running project to which you
have access.
Any running project to which you
have access.
You can configure ranges through any function block that contains a range name. Once you have defined it, the range is available for any other range source architecture that you configure.
Steps to select a range as a source include.
|
|
Open the P1 dialog box. |
|
|
Use P1 dialog box features. |
|
|
(Optional) Use Range Browser features. |
|
|
(If an existing range is not acceptable) Configure the range. |
Open the P1 dialog box.
(Recommended) Create a new Routing Logic Module.
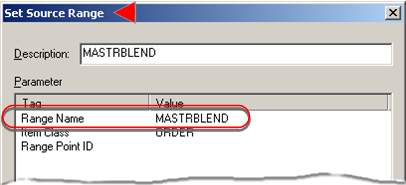
Double-click the Range Name or Hold Active Range parameter in function blocks including:
|
|
Set Source Range |
|
Begin Spread Range Block Module |
|
|
|
Rotation Pull Ahead |
|
|
Apply Hold to Range. |
|
|
Apply Hold To Item |
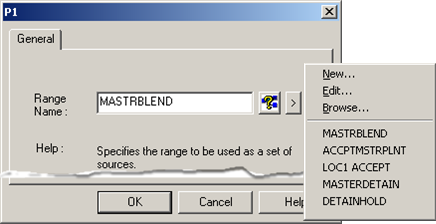
A P1 dialog box opens.
The P1 dialog box provides you with the Browse, add and editing options that other RCO function blocks offer.
Use P1 dialog box features.
Do any of the following through the P1 dialog box.
|
Option |
P1 Dialog Box |
||
|
Range Name |
Identifies the range to:
|
||
|
Browse buttons |
|
Opens the Range Browser |
|
|
Popup Menu button |
|
Displays the popup menu |
|
|
|
Selections are: |
||
|
|
New |
Opens a new Range Viewer dialog box. |
|
|
|
Edit |
Opens the Range Viewer for a range that is entered in the Range Name field. |
|
|
|
Browse |
Opens the Range Browser. |
|
|
|
Recent ranges |
Uses the range that is selected in the list. |
|
|
OK |
Closes the P1 dialog box; displays the range as the parameter value. |
||
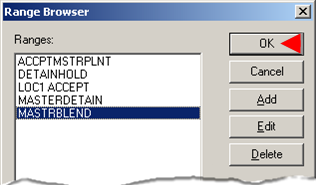
The Range Browser lists all of the ranges that have been configured for the project.
(Optional) Use the Range Browser.
If you opened the Range Browser you can use the buttons to do any of the following.
|
Button |
Description |
|
OK |
Closes the Range Browser and enters the selected range into the Range Name field in the P1 dialog box. |
|
Cancel |
Closes the Range Browser without selecting a range. |
|
Add |
Opens a new Range Viewer dialog box. |
|
Edit |
Opens the Range Viewer for the selected range. |
|
Delete |
Deletes a selected range. |
The Range Viewer dialog box is either blank or contains regions and locations that are included in a selected range.
Configure the range.
Depending on whether you are adding or editing a range, the Range Viewer dialog box is blank or contains regions and locations that are included in a selected range.
Do the following to configure the range.
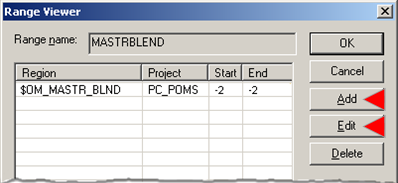
Add to or edit the list as follows.
Click .
A blank Range Editor dialog box opens.
Select a region in the list and click .
The Range Editor dialog box opens with the current configuration.
Enter or edit the ranges as follows.
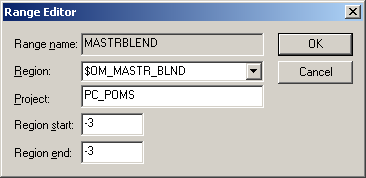
|
Field |
Description |
|
Range name |
(Read only) Name entered in the Range Viewer Range name field. |
|
Region |
Region to be included in the range. |
|
Project |
Name of a running project from which a region is selected. |
|
Region location or location code for the first location to include in the range. |
|
|
Region location or location code for the last location to include in the range. |
Click .
The Range Viewer displays the region and selected location codes in the Region list.
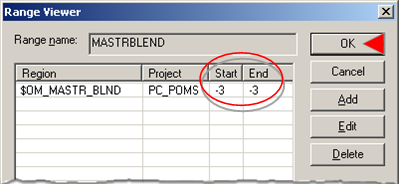
Example
The example computer factory:
![]() Wants to be able to select the
next order that should be sent to the $OM_PLANT_BLND region.
Wants to be able to select the
next order that should be sent to the $OM_PLANT_BLND region.
![]() Creates a range that includes all
locations in the $OM_MASTR_BLND region.
Creates a range that includes all
locations in the $OM_MASTR_BLND region.
Continue to add, edit or delete regions until the range has all of its regions/locations.
Click .
The P1 dialog box opens with the selected range in the Range Name field.
Click .
Result: The range displays as the value for the Range Name parameter.
|
|
RSA function blocks list. |
|
|
Step 1. Define the Source Range |