To open the OPC Item /Browse import
3.
Select Item / Browse icon ![]()
4. The OPC Item Browse / Import Dialog Panel opens.
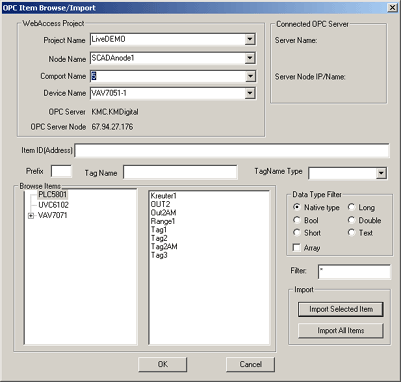
Figure 14.12 OPCTool - Item Browse / Import
5. Select the desired Project from the pull down list (if you have more than one Project). The first project, listed alphabetically, is selected by default.
6. Select the SCADA node from the list (if you have multiple SCADA Nodes). This is the SCADA node that will collect data from the OPC Server. The SCADA node must have an OPC Comport and Device configured before you can import.
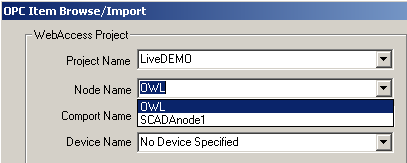
Figure 14.13 OPCTool Pull-down menu - Select SCADA Node
7. Select the Comport configured to this OPC Server.
The OPC Server and Server Type will change to reflect the configuration of the Comport. If the selected Comport is configured for an OPC Server, the OPC Server named and OPC Server Node type appears.
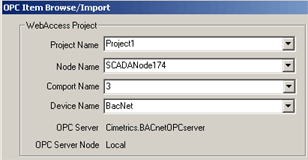
Figure 14.14 ComPort with Cimetrics Bacnet OPC Server
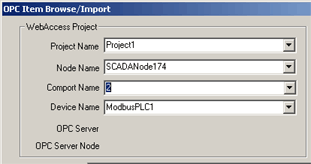
8. Confirm that the SCADA Node / Comport you have selected is configured for the OPC Server you have connected the OPC Tool.

Figure 14.16 OPC Server Names should match for COMPORT and Connected
The COM Port’s OPC Server is listed under the WebAccess Project information area below the Comport and Device Name.
The Connect OPC Server area, at the Top Right, shows the OPC Server that the OPC Tool is currently connected to.

Figure 14.17 OPC Tool Connected to this OPC Server
9. Select the Type of Tag Conversion Type (Tag Name Type). WebAccess Tag names are limited to 15 characters and the OPC Item names are often much longer.

Figure 14.18 OPCTool - Tag Name conversion Type
a. Short Tagname will use the OPC Data Point name (the Panel on Right) as the Tag Name. If the same Data Point has already been selected from another item, WebAccess will append a sequential number to the tag name.
b. Convert Tagname will use both the Item Name and Data Point Name plus conversion rules create a Tag Name. The conversion rules are described in the OPCTol.ini file. The Convert Tag Name will give you the greatest control in creating tag names automatically. Please see section OPC TOOL INI file of Conversion Rules, section 3.5.3.1
c. Sequential Tagname will number the tag consecutively: Tag1, Tag2, etc. If you modify the Tagname field (i.e. replace TAG), the tool will append a number to the name you enter and track the number of previous tag name roots.
d. ItemID will use the OPC Item Name (from the Panel on Left) for any Data Point selected (from Panel on Right). This is typically used when the same Data Point (e.g. present value) is selected for all Items and the Item Name is the desired Tag. Sequential Numbering of the Tag Name will occur if multiple Data Points are selected from the same Item (e.g. device_1967__analog_I, device_1967__analog01, device_1967__analog02).
Underscores (_) will replace Blanks (white spaces) in OPC Item and Data Point names.
10. Add a Prefix, if desired. Prefix is limited to 2 characters max.
![]()
This prefix will be the leading characters of the WebAccess Tag Name. For example, Prefix "49" will yield 49TIC101, 49PIC202, 49YS333 etc.
The Prefix is commonly used to help users distinguish between multiple process units that have identical OPC naming conventions inside each process unit (for example 10 Air Handlers, all with identical control databases and OPC data point names).
11. Data Type Filter - new users are recommended to select Native Type (the default) and use the wildcard (*) for the Filter.
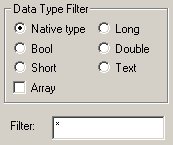
Figure 14.19 OPCTool - Data Type Filter
The Data Type Filter will limit the Data Points listed to only the Data Type selected (Boolean, Long Integer, etc).
11a. Filter is an OPC server specific filter string. Not all OPC Servers support Item Filter. This is entirely free format. Although the valid criteria are vendor specific, a typical filter is T* where all tags beginning with "T" are displayed (e.g. TI100, TI101, TC102). The wildcard (*) is recommended for new users.
12. Select an OPC Item (Panel on Left) under Browse Items.
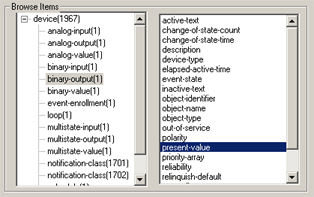
Figure 14.20 OPCTool example of OPC Tag Items
13. Select a Data Point (Panel on Right) associated with the selected OPC Item. Notice that the List of Data Points (Right Panel) changes as you select different Browse Items (Left Panel).
Note that each Item in an OPC Server can have multiple data points associated with it.
14. The proposed TAGNAME appears in the Tagname field (less any Prefix). Modify the Tagname if desired.

Figure 14.21 OPCTool example of OPC Item ID and WebAccess Tagname
15. Item ID (Address) describes the addressing that will be used to read data from the OPC Server. It is recommended to accept this without modification.
16. Click the Import
Selected Items button. ![]()
17. Select another OPC Item, and repeat steps 9 to 15 until all desired tags are imported.
18. Select OK to
confirm the Import of tags to WebAccess.
If you press Cancel, all tags imported since your first started the
Add/Import Tags will be aborted.
19. The OPC Tool Client will list the Tag Names imported and the OPC Item addresses. The WebAccess Tag names are listed on the left (under Tag Name) and the OPC Items are listed on the right (under ItemID).
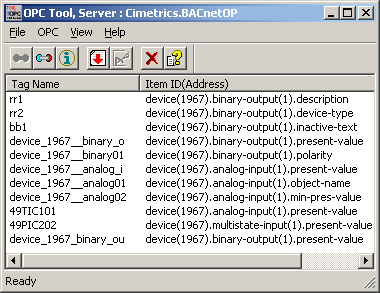
Figure 14.22 OPCTool - Imported Tagname and OPC Items
20. You can have the WebAccess Project Manager open while using the OPC Tool to import Tags.
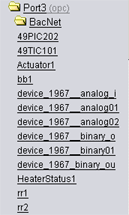
Figure 14.23 OPC Tagnames in WebAccess Project Manager
By closing and opening the OPC Port Icon, in the Project Manager, you will refresh the tag list and see the Tags that you have imported. Once Imported, you can rename these tags, assign alarms, etc. You can also Delete imported tags and then re-import them allowing you to experiment with naming conversions, etc.
The Convert Tagname will convert OPC Item and Data Point names into WebAccess Tag names using conversion rules. The Convert Tagname will use the Item Name appended to Data Point Name plus the conversion rules in the OPCTol.ini file.
Users can modify this file to create Name conversion rules
The OPCTol.ini is located on the Project Node, typically at C:\WebAccess\Node\OPCTol.ini
A sample of the Version 3.0 OPC Tool INI file for the Barrington OPC Server is listed below.
Each Section must be preceded by the official OPC Name in square brackets []. For example, the Barrington OPC Server is named BarSys.OPCServer. The Section describing conversion rules for the Barrington OPC Server are in a section labeled [BarSys.OPCServer]
The
rules are simple.  Text String OPC = Text String in
Tagname.  For example, Digital Output.Channel=DO means convert
the string "Digital Output.Channel" into a tag name with DO.
It
may take an experimental or test database where you import OPC
Items and Data Points unchanged, then create rules to automatically
shorten them.
[TAGNAME_TYPE]
//0: Leaf as
TagName
//1: Custom
Conversion
//2:
Sequential
//3: TagName same
as ItemID
BarSys.OPCServer=1
Matrikon.OPC.Simulation=1
ThinknDo.TnDOPC.1=0
RW.FASERVER.3=2
KEPware.KEPServerEx.V4=2
Cimetrics.BACnetOPCserver=1
[BarSys.OPCServer]
Digital
Output.Channel=DO
Digital
Input.Channel=DI
Analog
Input=AI
Analog
Output=AO
Channel=Ch
Communication=Comm
Extend_Service.Extend_Flag=ExHours
Flag_Schedule.Schedule=Z
Flag_Status.Flag=Occupancy
Sub_Schedule=SubSch
Start_Date=StrtD
Start_Time=Start
Stop_Date=StopD
Stop_Time=Stop
Holiday_Flag=HFlag
MF_Weekday_Flag=MF_WkFlag
Schdule_Serial=Sch_Serial
Schedule_Name=Sch_Name
Weekday_Flag=Wk_Flag
Monday_Friday=Mon_Fri
Weekday.Monday=Mon
Weekday.Tuesday=Tue
Weekday.Wednesday=Wed
Weekday.Thursday=Thu
Weekday.Friday=Fri
Weekday.Saturday=Sat
Weekday.Sunday=Sun