This section assumes you have already created the BLOCKS and TAGS you plan to add to your Faceplate Groups and Overview Group Displays. You can type in the Tag Names and Block Names of tags and blocks you plan to build.
This section assumes you have started Internet Explorer web browser and connected to your Project Node.
1. Start the Project Manager (WebAccess Configuration).
2. Login with User Name and Password.
3. Select your Project Name.
4. The Project Manger opens.
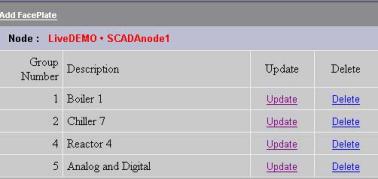
5. Select Faceplate.
The Faceplate List page appears.
Figure 5-31Faceplate Group List - Project Manager
6. Select Update of the Faceplate Group you want to modify.
7. The Update Faceplate Group page opens.
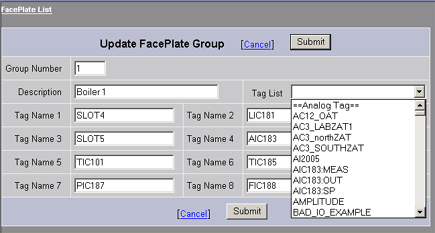
Figure 5-32Update Faceplate Group
8. Select the field next to Tag Name 1.
9. Open the Pull down list by clicking on Tag List (Figure 5-30). This shows the names of all Analog Tags and Discrete Tags. Lists both Blocks and Tags.
10. Scroll down the Tag List. Click the Block Name or Tagname desired. The Block or Tag name should appear on the Tag Name 1 field.
11. You can Type Tag names and Blocks. You can also copy and paste Tag Names and Block Names from the Left Frame of your browser (be sure to type block name with parameter).
If you want to enter a Block, type only the Block Name. For example, enter TIC101. This will show all parameters for the block.
Note - If you enter the full Blockname:parameter, only that one parameter would appear. For example entering TIC101:MEAS would not show the other parameters for the block TIC101.
12. Press Submit when finished making changes to your Faceplate Group.