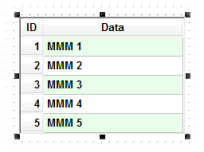
The Grid object allows you to read/write data in a tabular format from the data source configured in the object.
To draw one, do the following:
- Click the Grid tool

- Click on the screen, click the left mouse button, and drag the mouse across the screen to create a box of the desired size (while holding down the mouse button).
- Release the mouse button, and the Grid Object will
display.
Figure 1. Sample Grid Object

Right-click on the Grid Object, and select
Properties from the menu. The
Object Properties dialog will open. Use this dialog to configure
the Grid Object's parameters:
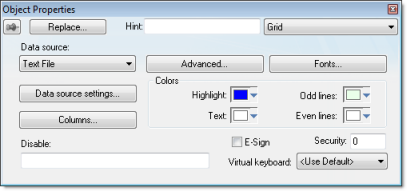
Figure 2. Object
Properties: Grid


- Data Source:
Select the data source type. The object supports three data
sources:
Data Source Description Text File Displays data from a text file in the ASCII or Unicode format (e.g., CSV text files). Class Tag Displays values from a Class Tag, where the members of the tag are fields (columns) of the grid object, and each array position is one row of the grid object. Database Displays data from an SQL Relational Database, using ADO (ActiveX Database Object) to exchange data with the database. - E-Sign: When you check this option, the user will be prompted to enter an electronic signature before entering or modifying data on the object.
- VK: Select a Virtual Keyboard type used for this object. The option <Use Default> selects the default Virtual Keyboard configured in the Viewer settings (Viewer on the Project tab of the ribbon). You can also specify a different Virtual Keyboard for this Grid object.
- Security: Enter the security system access level required for the object/animation.
- Disable: You can enter an expression in this field to disable data input or action by the user.
- Highlight Color: Select a background color for the selected row, during runtime.
- Text Color: Select a text color for the selected row, during runtime.
- Win Color 1: Select a background color for the odd rows.
- Win Color 2: Select a background color for the even rows.
- Fonts: Click to launch the Fonts dialog, where you can configure the font settings for the text displayed in the Grid object.
- Columns: Click to launch the Columns dialog, where you can configure the settings (such as label, column, width, etc.) for the columns of the Grid object.
- Data: Click to launch the Data dialog, where you can specify a data source for the Grid object.
- Advanced: Click to launch the Advanced dialog, where you can configure several settings for the Grid object.