InduSoft Web Studio provides development tools for all IWS projects, and it can be installed on a PC running Microsoft Windows XP, Windows Vista, or Windows 7 operating system. For more information, see System Requirements.
You can install the development application either from the web download or from the InduSoft Web Studio installation CD. For projects running on Windows Embedded target systems, you can use the development application to download CEView (the runtime engine) to the target system via serial or TCP/IP link.
The IWS installation program creates directories as needed, copies files to your hard drive, and creates the InduSoft Web Studio icon on your Windows desktop.
- You must have Administrator privileges on your PC in order to install or uninstall the development application.
- You must uninstall an older version of the development application (or move it to a different directory) before installing a new version. Also, you cannot install the same version of the development application in two different paths on the same PC.
The instructions for installing InduSoft Web Studio and CEView are provided inthe following two sections.
Installing the Development Application on Your Windows PC
- Turn on your PC and be sure that no other programs are running.
- Insert the installation CD into your PC's CD-ROM
drive.
Internet Explorer should run automatically and show the CD's welcome screen. If it does not — for example, if you have the Autorun feature turned off in your Windows settings — then you can manually show the screen by using Windows Explorer to locate and open the file D:\InduSoft.htm.
- In the welcome screen, select the product that you
want to install.
Internet Explorer will ask if you want to run or save the installer.
- Click Run.
The product's installation wizard will begin.
- Follow the wizard's instructions to proceed with the installation.
- When the installation is finished, select Yes, I want to restart my computer now and then click OK.
After your PC has restarted, you can run the development application. See Starting the Software for instructions.
For more information about Microsoft .NET Framework, see Database Appendix A: Using ODBC Databases.
Installing CEView on Your Windows Embedded Device
CEView is the runtime engine for IWS projects on Windows Embedded devices. CEView must be installed on your device before you send your project to it.
Where the Files Are Located
[…]\InduSoft Web Studio v7.0\Redist\
[…]\InduSoft Web Studio v7.0\Redist\version\processor\
- version is the version of the
operating system on the device where CEView will be installed:
- The\WinCE 5.0 folder contains the files for Windows CE and Windows Mobile 5.0 or later; and
- The\WinEmbedded folder contains the files for Windows XP Embedded and Windows Embedded 7.
- processor is the processor used by your Windows CE device. We provide a CEView runtime for every processor that is currently supported by the Windows CE operating system (e.g., Pocket2003-ArmV4, ArmV4i, x86). For more information, consult the manufacturer's documentation for the device.
To install the files on your device, use the Remote Management tool in the development application.
Installing via TCP/IP (Ethernet)
- Make sure your Windows Embedded device is connected to your network.
- Turn on the device.
The Remote Agent dialog should open automatically. If it does not, then you must manually install the file CEServer.exe on the device. The file is located here:
[…]\InduSoft Web Studio v7.0\Redist\version\processor\CEServer.exe
There are different ways to install the file — for example, you can use Microsoft ActiveSync (for Windows 2000 and Windows XP) or Windows Mobile Device Center (for Windows Vista) to communicate directly with the device or you can map the device as a shared folder on your PC. For more information about copying and executing files, consult the manufacturer's documentation for the device.
- In the Remote Agent dialog, click Setup and then configure the communication settings for the device's network connection. In particular, note the IP address of the device.
- Start the development application on your PC.
- On the Home tab of
the ribbon, in the Remote
Management group, click Connect. The Remote Management dialog is displayed:
Figure 1. Remote Management dialog
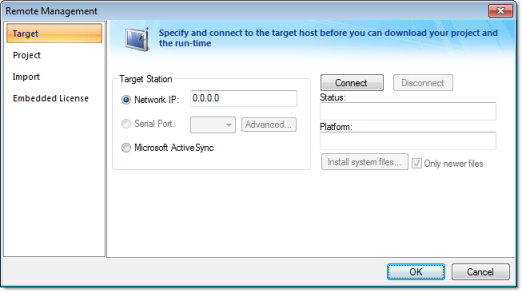
- In the Target System group-box, select Network IP and then type the IP address of the device.
- Click Connect to
establish a connection between the development application and the
device.
If the conncection is successful, then the device's specifications will be displayed in the Platform text-box.
- Click Install System Files to download the CEView files to the device.
- When the installation is completed, click Disconnect.
For more information about downloading and running finished projects on the Windows Embedded device, please see Remote Management.
Installing via Microsoft ActiveSync
- Make sure that Microsoft ActiveSync (for Windows 2000 and Windows XP) or Windows Mobile Device Center (for Windows Vista) is installed on your PC.
- Turn on the Windows Embedded device and connect it to your PC. Most devices should be able to connect via USB.
- Start the development application on your PC.
- On the Home tab of the ribbon, in the Remote Management group, click Connect. The Remote Management dialog is displayed.
- In the Target System group-box, select Microsoft ActiveSync.
- Click Connect to
establish a connection between the development application and the
device.
If the conncection is successful, then the device's specifications will be displayed in the Platform text-box.
- Click Install System Files to download the CEView files to the device.
- When the installation is completed, click Disconnect.
[…]\InduSoft Web Studio v7.0\Redist\ActiveSyncUnlock.exe
Copy this file to the device using the stand-alone version of Microsoft ActiveSync and then execute the file on the device. It doesn't matter where on the device the file is located. (For more information about copying and executing files, consult the manufacturer's documentation for the device.) When this is done, try again to use the Remote Management tool to connect to the device.
For more information about downloading and running finished projects on the Windows Embedded device, please see Remote Management.