Your IWS project can be configured to run under Windows services. Microsoft Windows services, formerly known as NT services, allow you to create long-running programs that run in their own Windows sessions. These sessions can be automatically started when the computer boots, can be paused and restarted, and do not show any user interface. These features make services ideal for use on a server or whenever you need long-running functionality that does not interfere with other users who are working on the same computer. You can also run services in the security context of a specific user account that is different from the logged-on user or the default computer account. For more information about services, please refer to the Microsoft Developer Network (MSDN) Library.
- To ensure that your project always runs with whatever system privileges it needs, regardless of the privileges of the user that is currently logged on to Windows;
- To prevent the user from interfering with your project while it is running; or
- To let your project keep running when there is no user logged on at all.
Creating and Configuring the Windows Service
Also, to perform these actions, you must be logged on as a user with administrative privileges and you should know how to use the Computer Management console. (To access the console, right-click the My Computer icon and choose Manage from the shortcut menu.)
There are two ways to create and configure the Windows service for your project: you can use the Service Configuration tool in IWS itself, or you can use the command-line utility that is installed with IWS.
Service Configuration Tool
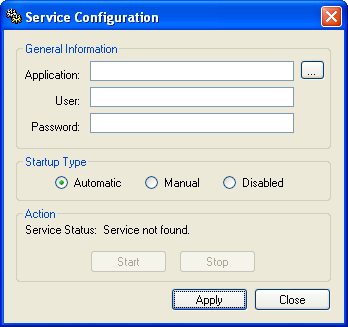
Creating a New Service
- Next to the Project box, click … to open a standard Windows file browser. Use the browser to find and select your project file.
- In the User and Password boxes, type the username and password (if any) for the Windows user account under which the service will run.
- Select a Startup Type.
- Click Apply. The service is created with the specified settings.
After the service has been created, it will appear in the Services console () under the name "InduSoft Web Studio". You can use that console to quickly stop and restart the service, if you don't want to run the IWS development environment.
Command-line Utility
You can also configure the service by using the command-line utility StdSvcInst.exe. It offers a few more options than the Service Configuration tool described above — such as specifying a name and description for the service — and it can be used without launching the IWS development environment. The utility is located in the \Bin folder of your IWS program directory. To run the utility, open a command prompt, navigate to the \Bin folder, and enter the command with the desired options.
StdSvcInst { -create -app filepath -startup { auto | manual | disabled } -user username -password password -name displayname -descr description | -start | -stop | -delete }
- -create
- Creates the Windows service.
- -app filepath
- Specifies which project file (project_name.app) the service will
load and run when it is started. (This is the same as the
Project box in the Service Configuration dialog.) You must
include the complete file path, and it must be enclosed in quotes.
This switch is required when you create a new service.
- -startup { auto | manual | disabled }
- Specifies how the service will start. (This is the same as the Startup Type in the Service Configuration box.) This switch is optional; if it's not used, then the default behavior for a new service is manual.
- -user username
- Specifies the Window user account under which the service will run. (This is the same as the User box in the Service Configuration dialog.) This is an optional switch; if it's not used, then the service will run under Local System.
- -password password
- Specifies the password for the given user account. (This is the same as the Password box in the Service Configuration dialog described above.) This is an optional parameter; it's not needed if no user is specified or if the specified user doesn't have a password.
- -name displayname
- Defines the service name that is displayed in the Computer Management console. The name must be enclosed in quotes. This is an optional switch; the default name is "Studio".
- -descr description
- Defines the service description that is displayed in the Computer Management console. The description must be enclosed in quotes. This is an optional switch.
- -start
- Starts the service. This is the same as starting the service using the Computer Management console or by clicking Start in the Service Configuration dialog.
- -stop
- Stops the service. This is the same as stopping the service using the Computer Management console or by clicking Stop in the Service Configuration dialog.
- -delete
- Deletes the service.
Example: Creating the Service
| IWS Project File | C:\Users\username\My Documents\InduSoft Web Studio v7.0 Projects\project_name\project_name.app |
| Startup Mode | Automatic |
| User | IWS |
| Password | IWS |
| Service Name | "InduSoft Web Studio" |
| Service Description | "Starts a IWS project" |
Note that the system must already have a user account named "Studio" with password "Studio".
- Make sure you're logged in as a user with administrative privileges.
- Open a command prompt ().
- Navigate to the Bin folder:
cd C:\Program Files\InduSoft Web Studio v7.0\Bin - Enter the command:
StdSvcInst –create –app "C:\Users\username\My Documents\InduSoft Web Studio v7.0 Projects\project_name/project_name.app" -startup auto –user IWS -password IWS –name "InduSoft Web Studio" –descr "Starts a IWS project"
If the procedure is successful, then the system will display the message Service created. Otherwise, it will display an error message.
Example: Changing the Project File
- Make sure you're logged in as a user with administrative privileges.
- Stop the service if it is running.
- Open a command prompt.
- Navigate to the Bin directory.
- Enter the command — for example, to set NTDemo as
the project file:
StdSvcInst –app "C:\Program Files\InduSoft Web Studio v7.0\Demos\NTDemo\NTDemo.app"
Example: Deleting the Service
- Make sure you're logged in as a user with administrative privileges.
- Stop the service if it is running.
- Open a command prompt.
- Navigate to the Bin directory.
- Enter the command:
StdSvcInst –delete
Configuring User Privileges
The service will run under the privileges of the user account specified in the User field of the Service Configuration tool (or by the -user switch of the command-line utility). If IWS needs some system resource to which that account doesn't have privileges, it will fail. Therefore, you must configure the account to have the necessary privileges.
Enabling the User Account to Log On as a Service
- Open the Local Security Settings console ().
- In the console window, select the folder "Security Settings\Local Policies\User Rights Assignment".
- In the list of available policies, double-click
Log on as a service.
Figure 2. Selecting the "Log on as a service" policy
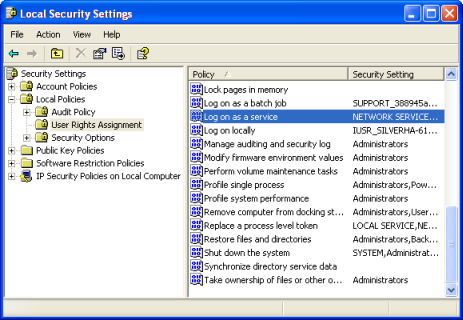
The Log on as a service properties page is displayed.
- Click Add User or
Group.
The Select Users or Groups dialog is displayed.
- Type the name of the user account under which you want the service to run.
- Click OK.
Giving the User Account Full Control Over the Program Directory
- Open Windows Explorer ().
- Choose .
The Folder Options dialog is displayed.
- Click the View tab.
- Make sure the option Use
simple file sharing is not selected.
Figure 3. Make sure simple file sharing is disabled
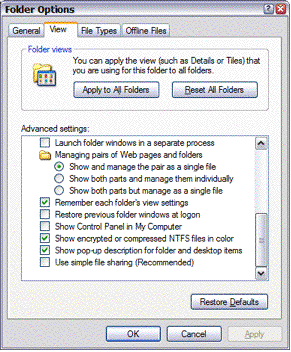
- Click OK to close the Folder Options dialog.
- Still in Windows
Explorer, locate and select your IWS program directory, i.e.,
the folder that contains the file project_name.APP.
In this example, the folder is NTDemo.
- Right-click the folder and choose Properties from the shortcut menu.
The directory's property sheet is displayed.
- Click the Security
tab.
Figure 4. Properties dialog for the program directory
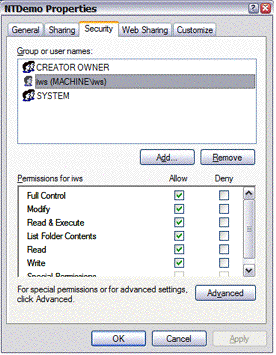
- Click Add and then
add the user account you specified when you created the service.
In this example, the user is iws.
- Select this user and then set its "Full Control" permission to Allow.
- Click OK to apply your changes and close the dialog.
- Close Windows Explorer.
Allowing the User Account to Run the OPC Client/Server Module
- Open the Component Services console ().
- In the console window, select the folder "Console
Root\Component Services\Computers\My Computer\DCOM Config".
Figure 5. Selecting the OPC Server module in the Component Services console
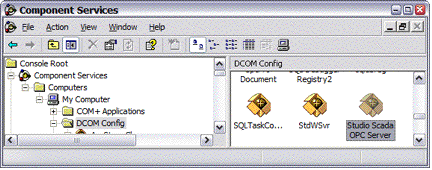
- In the DCOM Config pane, right-click the
Studio Scada OPC Server icon and
then choose Properties from the
shortcut menu.
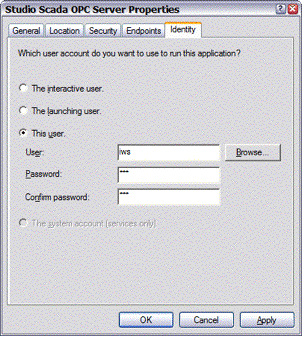
The Studio SCADA OPC Server propety sheet is displayed.
- Click the Identity tab.
- Click This user
and then complete the fields with the same user and password that
you specified when you created the service.
In this example, user is Studio and password is also Studio.
Figure 6. Entering the user name and password
- Click OK to apply your changes and close the property sheet.
- Close the Component Services console.
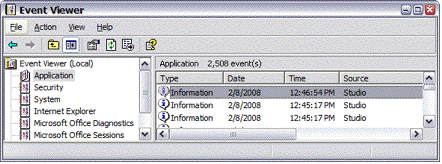
Troubleshooting
When IWS runs under Windows services, it has no user interface. Therefore, if an error occurs, it will only be logged as a Windows application event. You can check the messages by using the Event Viewer console ().