|
Add procedure. |
|
|
Important. |
Add Procedure
Adds the selected entity to Change Management.
Select a project folder, base configuration icon or managed file that is or belongs to the entity that will be added.
Do one of the following.
|
Entity |
Do one of the following. |
Adds |
|
|
|
Computer project |
|
|
Right-click; select Add on the Popup menu. |
Selected entity. |
|
|
Click Project>Manage>Add on the Workbench menu bar. |
The Proficy CIMPLICITY project. |
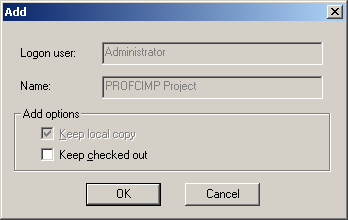
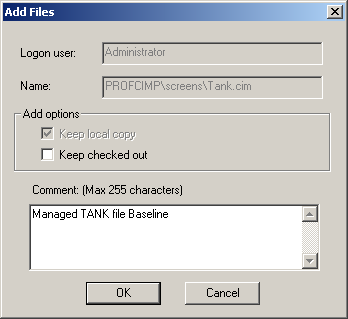
An Add or Add Files dialog box opens, based on the selected entity.
Enter specifications as follows.
|
Project or base configuration |
|
|
Managed files |
Project or Base Configuration
|
Field |
Description |
|
|
Logon User |
(Read-only) Displays the Change Management user name. |
|
|
Name |
(Read0only) Selected entity name. |
|
|
Keep Local copy |
(Read-only) A copy of the entity being added is maintained on the local computer. |
|
|
Keep check out |
Checked |
The entity is checked out to the local computer after it is added. It:
|
Managed Files
|
Field |
Description |
|
|
Logon User |
(Read-only) Displays the Change Management user name. |
|
|
Name |
(Read0only) Selected entity name. |
|
|
Keep Local copy |
(Read-only) A copy of the entity being adds is maintained on the local computer. |
|
|
Keep check out |
Checked |
The entity is checked out to the local computer after it is added. It:
|
|
Comment |
Description for a user to distinguish the entity version being checked in from other versions. |
|
|
|
Max. Length |
255 characters. |
Click .
The selected entity is added to Change Management.
Results
If an entity that can be labelled is added:
An Apply Label dialog box opens.
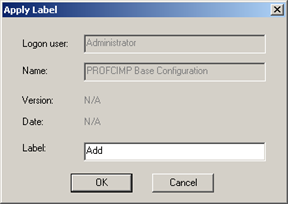
(Optional) Enter a Label to conform to your system standards.
Click either:
|
OK |
|
|
Cancel |
|
The entity is added to the Change Management server.
If Keep checked out was checked, Checkout icons display to the left of the added entities in the Workbench.
![]() An entity is not managed until it is added to Change
Management; this includes the base configuration. If you create a
managed file, e.g. a new CimEdit screen or a new alarm setup,
remember to add it separately or in a full project add so it will
be included in the managed set.
An entity is not managed until it is added to Change
Management; this includes the base configuration. If you create a
managed file, e.g. a new CimEdit screen or a new alarm setup,
remember to add it separately or in a full project add so it will
be included in the managed set.
![]() If two projects (which would be on different computers) have the
same name, the first project's .gef file
that is added to Change Management has precedence over the
second.
If two projects (which would be on different computers) have the
same name, the first project's .gef file
that is added to Change Management has precedence over the
second.
Example
Two computers add the .gef file for projects with the same name to Change Management.
|
Computer |
Project Name |
When the .gef file was Added |
|
Comp1 |
Project A |
July 9, 2008 |
|
Comp2 |
Project A |
August 2, 2008 |
Since Comp1 added Project A's .gef file first, Change Management gives Comp1's Project A .gef file precedence over Comp2's Project A .gef file..
Use Case
A production version of a project is running on a production server.
The project is checked out to a test project running on a test server.
Once tested, the tested project is returned to Change Management where the production project can get the latest version at a break in production, e.g. the weekend.
The .gef file is the file from the production version.
|
|
Proficy Change Management procedures. |