Points can be created and edited in CimEdit, when the project is stopped or running.
![]() Important
Important
![]() When a project is stopped, you
will have to perform a Configuration Update to copy the
configuration from the Master directory to the Data directory so
they are both the same and the changes are applied to runtime.
When a project is stopped, you
will have to perform a Configuration Update to copy the
configuration from the Master directory to the Data directory so
they are both the same and the changes are applied to runtime.
![]() If the project is running, make
sure dynamic configuration is enabled for any point changes to
immediately take effect.
If the project is running, make
sure dynamic configuration is enabled for any point changes to
immediately take effect.
Click in the Home>Runtime group.

Points can be created or edited through any field that allows points as entries.
|
Create a new point. |
|
|
Edit a selected point. |
Create a new point
Open the Properties dialog box for a selected object.
Click the Popup Menu button ![]() to the right of an
Expression field.
to the right of an
Expression field.
The Popup menu opens.
Select New Point.
![]()
The New Point dialog box opens.
Create a new point.
Important: Make sure to adhere to point naming rules if you create a new point through CimEdit.
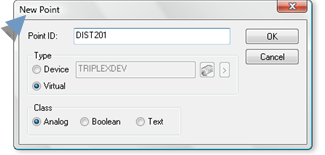
Configure the new point.
Close the Point Properties dialog box for the new point.
Result: The new point displays in the Expression field.
Edit a selected point.
Select a point in the Expression field.
Select Edit Point... on the Popup menu.

The Point Properties dialog box for the selected point opens.
Make any modifications to the point configuration.
Close the Point Properties dialog box.
Result: The point modifications are applied:
![]() Immediately if the project is
running and dynamic configuration is enabled.
Immediately if the project is
running and dynamic configuration is enabled.
![]() After the next Configuration
Update.
After the next Configuration
Update.
|
|
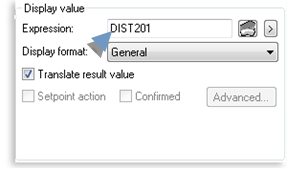
Points configured in CimEdit. |