Click ![]() to the right of the Current Region field in the Region
dialog box.
to the right of the Current Region field in the Region
dialog box.
Select New from the popup menu.
The PRT Region Configuration dialog box opens displaying the Region tab.
Begin configuring a region by filling in the following fields at the top of the PRT Region Configuration dialog box.
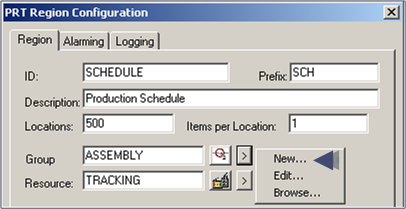
|
Field |
Enter |
|
ID |
A unique name for the region Note: Tracker fills the Prefix field automatically as you type in the region ID. |
|
Description |
A brief description to help users identify the region. |
|
Locations |
The maximum number of available locations that are allowed in the region. |
|
Items per Location |
The maximum number of items that can reside at a single region location. Include serialized and non-serialized items |
|
Group |
Name for the group with which this region will be associated in the field. Note:
If you do not have any groups already configured, it is recommended
that you click You will also be able to create a group by double-clicking the Group icon in the TrackerCfg_Ui PRT tree. |
|
Resource |
Enter the CIMPLICITY resource with which alarms will be generated at the tracking region level in the field. Note: If a resource is not designated, you can
click |
![]() Step 3. Configure regions.
Step 3. Configure regions.