You can configure alarming and logging options from both the TrackerCfg_UI and the RCO_UI.
The difference is as follows.
|
From the: |
Alarming and Logging changes are: |
|
TrackerCfg_UI |
Stored in the database, but are not effected dynamically. |
|
RCO_UI |
Effected dynamically, but are not stored in the database. |
![]() Important: Make sure the RCO site is
locked in order to enable the Alarming / Logging option on the
popup menu.
Important: Make sure the RCO site is
locked in order to enable the Alarming / Logging option on the
popup menu.
Right-click a Site icon ![]() in the Tracker window left
pane.
in the Tracker window left
pane.
Select Alarming/Logging from the Popup menu.
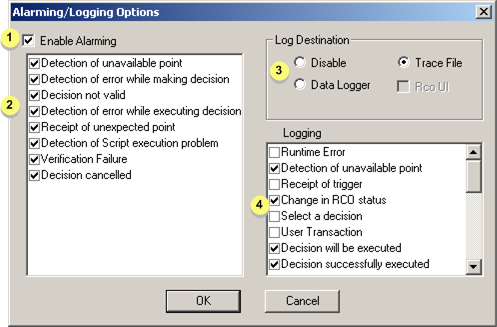
The Alarming/Logging Options dialog box opens.
Check the options that should be enabled.
|
1 |
Enable Alarming enables alarms for selected conditions. |
|
|
2 |
Checked states have enabled alarms |
|
|
3 |
Checked selects the log destination as follows. |
|
|
|
Disable |
Disables logging |
|
|
Data Logger |
Logs event to the database logger. |
|
|
Trace File |
Logs detailed data to a trace file with a .log extension in the project directory. |
|
4 |
Checked conditions cause data to be logged. |
|
Click OK to save alarming and logging options, or click Cancel.
Enable data logging from the data logging side.
Configure the datalog.idt file for RCO logging.
Configure the data_field.idt file for RCO logging.
|
|
RCO Alarms displayed in the Workbench. |
|
|
RCO site logging summary overview. |
|
|
Routing Control Object configuration. |