Frames display multiple objects in the same window, similar to an animated GIF on the internet. The contents of a Frame can be a WebAccess Drawing, (i.e. vector based) or a bitmap. You can convert animated GIFs to frames also. There can be no animation in the individual frames. The only animation provided is my changing from one frame file (*.DFM) to another in the same window. A Frame window is usually a Polygon animated with Dynamic -> Animation then pick the Frame radio button.
Use of Bitmaps as Frames or as any object is not recommended if you have a slow network connection to the clients because of the large file sizes. This example creates a graphic file over 3.8 Mega Bytes.
It is recommend to use Vector Graphics and True type fonts in frames to reduce the file size.
This example uses animated GIF, converted to Bitmaps by WebAccess DRAW to create an animated frame to show the similarities and differences between WebAccess Frames and GIFs. They are similar in concept.
The generalized steps to creating frame animation are:
1. Start DRAW.
2. Copy or Upload the GIF to the BMP folder.
3. Create Bitmaps from the animated GIF.
4. Save the first frame files (*.DFM) from the Bitmaps.
5. Draw additional bitmaps and save as frame files (*.DFM).
6. Optionally save the DRW file with all your drawn bitmaps.
7. Open or create the display that will hold the animated Frame.
8. Draw a Rectangle to hold the frame animation. Alternatively you can use a Panel.
9. Animate the Rectangle with Dynamic Frame animation.
10. Enter a Tag name for the Animation.
11. Optionally, create a Local Tag file and use a Local screen Tag to animate the frame.
12. Optionally create a script to animate the Frames.
13. Save the BGR and DRW files.
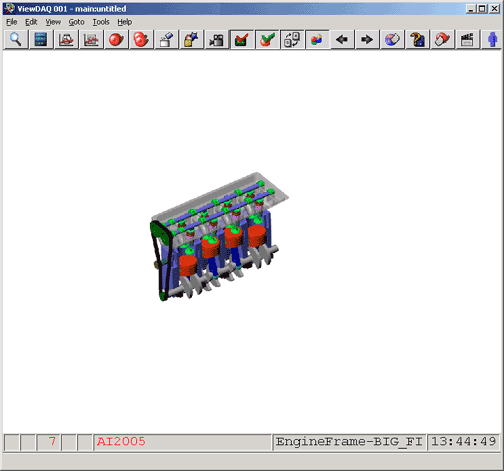
Below is an example of converting an animated GIF of a rotating engine to a set of Frames in WebAccess.
1. Start DRAW
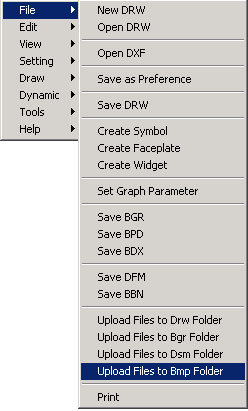
2. Upload the GIF to the BMP folder.
2a. Right Click -> File -> Upload Files to BMP Folder.
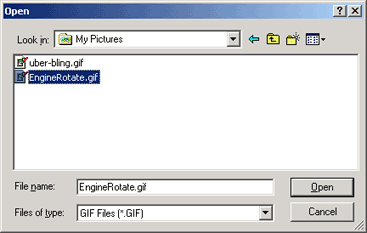
2b. Select Files of Type: GIF Files (*.GIF)
2c. Browse to your GIF.
If you are on a client this will copy the GIF to the Project Node so other users can access it also. It will become part of the Project.
2d. Select OPEN.
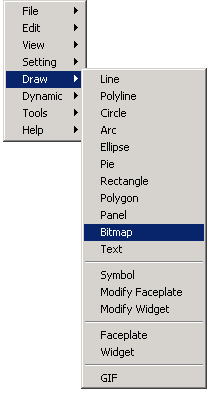
3. Create Bitmaps from the animated GIF.
3a. Right Click ->Draw -> GIF
3b. The "File List" Dialog Box opens.
3c. Select the GIF file.
3d. Select OK
If it is a large GIF, there will be a pause while it is converted to individual bitmaps
Note - WebAccess converts each frame in the GIF to an individual bitmap and opens the Draw Bitmap Dialog Box with the first bitmap selected.
4. Create the first frame files (*.DFM) from the Bitmaps.
4a. The "Bitmap File List" dialog box should be open, with the first Bitmap selected.

4b. Optionally, select Transparent.
4c. Optionally, select a color that will be made transparent.
4d. Select OK.
4e. Position the Bitmap on the screen.
4f. Click with the mouse to draw the bitmap.
For this example, we are going to use just one object per frame, the bitmap. Optionally you could select multiple object, including a mixture of vector and bitmap objects to include in a single frame. Most user will probably use vector objects drawn in DRAW for frames. Text and any object drawn with DRAW or DrawDAQ can be used as a frame.
If the bitmap is not already selected, then select by clicking it with the mouse.
Hint - its selected if there is a box with handles around it
4g. Right Click -> File -> Save DFM .
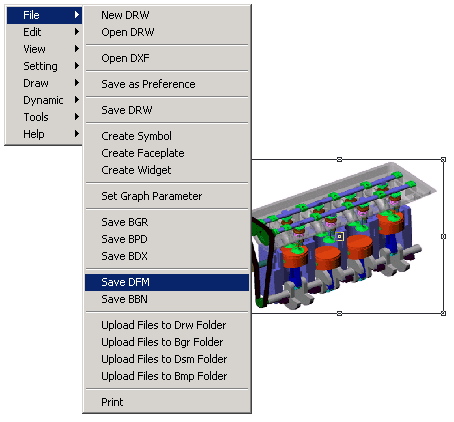
4i. Enter a name for the DFM file, for example engine1.
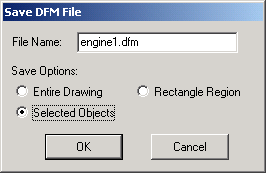
4g. Under Save Options, use "Selected Objects".
4h. Select OK.
This should save the Bitmap as a DFM file. If it prompts you to select an object, then select the bitmap you drew.
5. Draw additional bitmaps and save as frame files (*.DFM) from the other bitmaps by repeating step 4, but now you have to start with Draw -> Bitmap.
In this example, you can erase the previous bitmap or you can just draw the next bitmap at another location on the screen.
5a. Right Click -> Draw Bitmap.
5b. The Draw Bitmap dialog box should open.
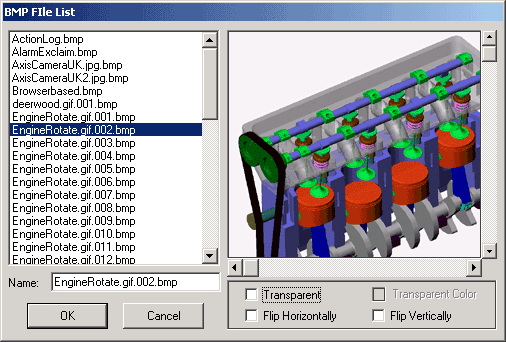
5c. Select the next bitmap (they should be numbered sequentially, 002, 003, etc.). For example select EngineRotate.gif.002.bmp
5d. Optionally, Select Transparent
5e. Optionally, Select a color that will be made transparent.
5f. Select OK
5g. Position the Bitmap on the screen.
5h. Left click the mouse to draw the bitmap
5i. Right Click -> File -> Save DFM
5j. Enter a new name for the DFM file.
This should be a different name than used previously. For example engine2.dfm, engine3.dfm, etc. If it asks you to"replace" you should cancel and type a new name. You need to name each DFM file uniquely. In this example, a different number is appended to the name.
5k. Under Save Options, use "Selected Objects"
5l. Select OK
This should save the Bitmap as a DFM file. If it prompts you to select an object, then select the bitmap you drew.
Repeat. If your frame has 16 elements (as in this example), you will have to repeat this another 14 times to create 16 unique DFM files. In this example, engine1.dfm, engine2.dfm, engine3.dfm ... engine16.dfm.
6. Optionally save the DRW file with all your drawn bitmaps. In this example, the bitmaps are the frame so it is no necessary. But if you where using multiple objects and vector objects, then you should save this DRW in order to edit or modify your frames.
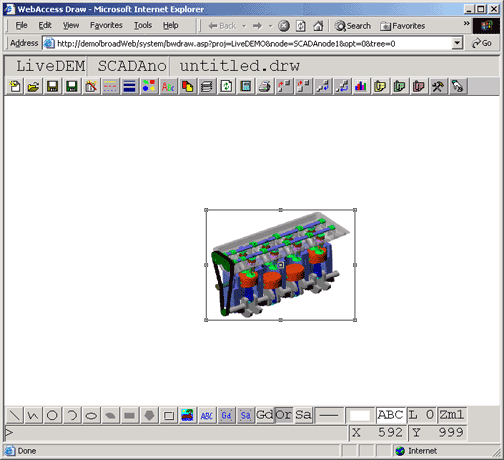
7. Open a the display that will hold the animated Frame.
File -> Open DRW
Select the name of your DRW.
Optionally, you can create a new graphic with File -> New.
8. Draw a Rectangle to hold the frame animation. Alternatively you can use a Panel.
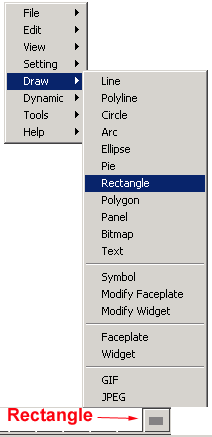
8a. Right Click -> Draw -> Rectangle
8b. Select first corner with a left click of the mouse.
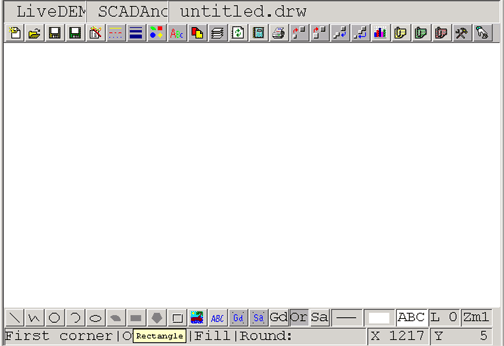
8c. Stretch the rectangle by moving the mouse.
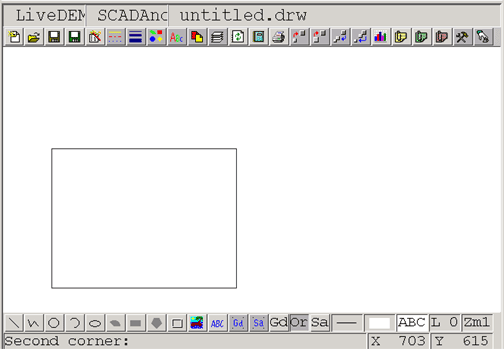
8d. Select the opposing corner with a left click of the mouse.
Hint - to make the rectangle the exact size of the original bitmap, draw one of the bitmaps first, then draw the rectangle around it. The frame will stretch or shrink to fit whatever size rectangle you draw.
9. Animate the Rectangle with frame animation.
9a. If it is not already selected, left click on the Rectangle that will hold the frame animation.

9b. Right Click -> Dynamic -> Animation
9c. Select the Frame radio button.
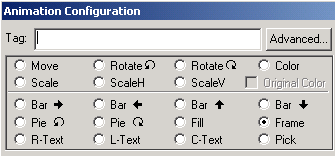
9d. The Frame dialog box opens.
9e. Select Multiple States tab.
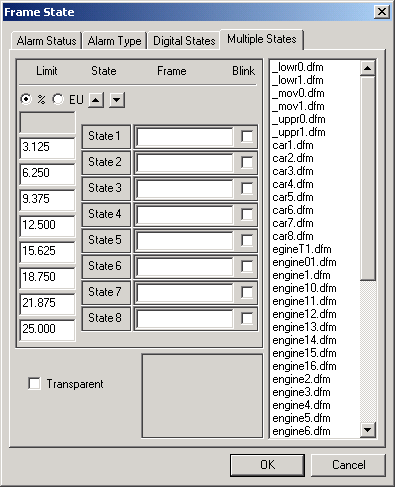
9f. A list of DFM files should appear, you should see your DFMs listed on the right (for example engine1.dfm, engine2.dfm).
9k. Select EU for Engineering Units.
9l. Enter the a value slightly lower than the first transition value of you tag (in this example enter 22.2 calculated as 360 divided by 16 ) This defines State 0 as any value less than or equal to 22.5.
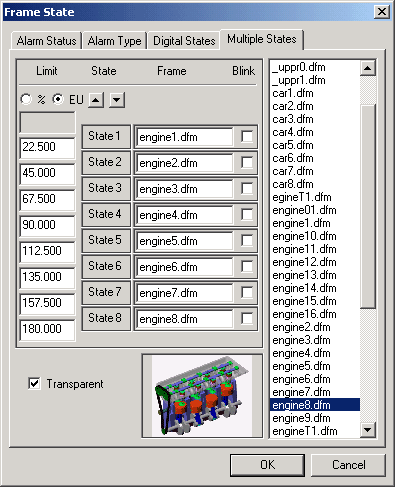
9l. Select the field next State 1, then select then name of the frame (*.DFM) that should appear when State 1 is true (i.e. engine2.dfm).
9m. Enter the a value slightly lower than the second transition value of you tag (in your example enter 45 ) This defines State 2 as any value greater than 22.5 and less than or equal to 45.
The script will rotate the value of a tag from 0 to 359 representing 360 degrees of rotation. We have 16 frames to show the 360. You would use different numbers depending on your application.
9n. Select the field next State 2, then select then name of the frame (engine3.DFM) that should appear when State 2 is true (i.e. any value between 45 and 47.5).

9o. Repeat for as many states as you need. In this example there are 16 states for the 16 frames.
The unused frame states will default to the last value you enter. The dfm name can be blank for the unused states.
9p. Select OK to save and close the Frame State dialog box.
If it beeps, you used something other than a rectangle or frame.
If it asks you to select an object, select the rectangle you drew in step 8 (you must have skipped step 9a).
10. Enter a Tag name that will cause the frame to
rotate.
For this example enter: crankshaft.
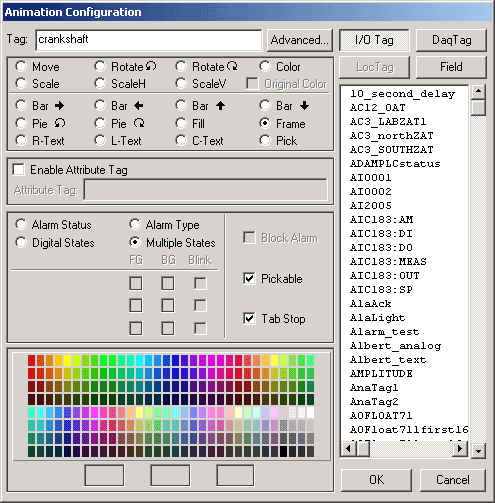
11. Optionally create a Local Tag file and local tag to animate the Frames.
You can also use an IO tag, constant tag, calculation tag or a system tag (like %ATMSECONDS). In this example I am using a script and a local screen tag. The Tag's value must change through all the states for the frame to change through all the frames.
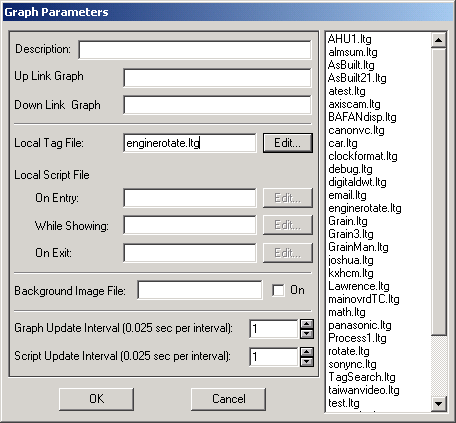
11a. File -> Set Graph Parameters
The set graph parameters Dialog box opens.
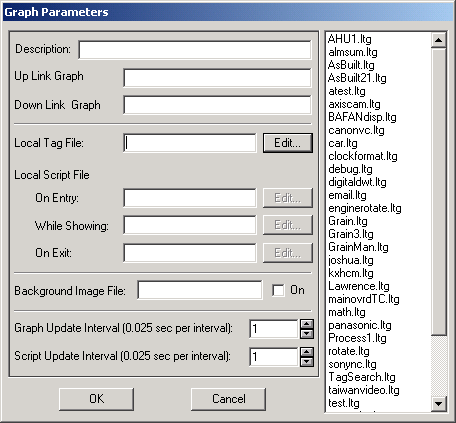
11b. Select the field next to Local Tag, then select the Edit button
The Local Tag Configuration dialog box opens.
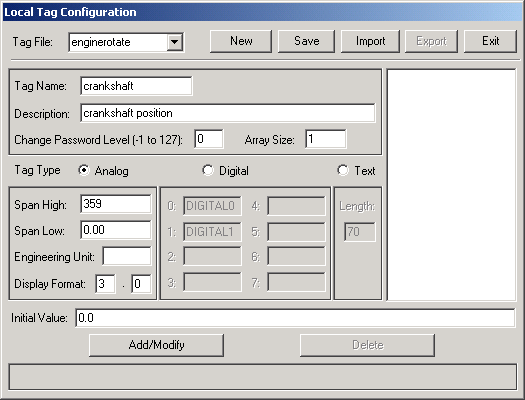
11c. Enter a Tag File name (example enginerotate).
11d. Enter a Tag Name (example crankshaft).
11e. Enter Span High (example 359).
11f. Select Add/Modify to create the Tag.
11g. Select OK to create the tag.
11h. Select Save to save the Tag file.
11i. Select OK to create the Tag file.
11j. Select Exit to close the dialog box.
11k. Enter the Tag file name in the Graph Parameters Dialog Box (or select it from the list at right).
12. Optionally create a script to animate the Frames.
12a.Select the field next to While Showing, then select the Edit button
The Script Configuration dialog box opens.
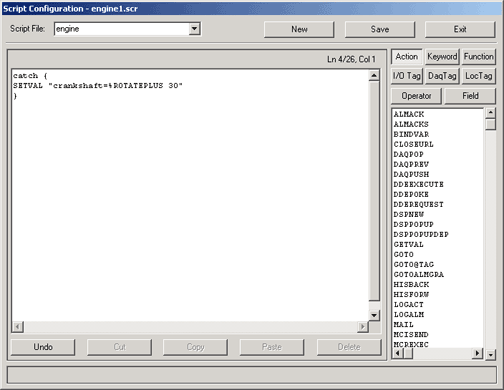
12b. Enter a Script File name (example engine).
12c. Enter Action Commands and Tcl keywords. For example:
catch {
SETVAL "crankshaft=%ROTATEPLUS 30"
}
12d. Select Save.
12e. Select Exit to close the Script Configuration Dialog Box.
12f. Enter the Script Name in the While Showing field of Graph Parameters dialog Box.
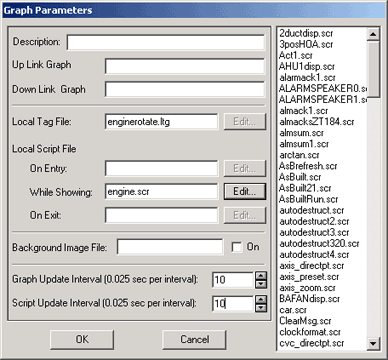
12g. Adjust the Script Update to 10 (the script will run 4 times per second)
12h. Adjust the Graph Update to match the Script Update or faster ( 10 or less).
12i. Select OK to save the Graph Parameters.
13. Save the BGR and DRW.
The BGR should look like the following withe the pistons going up and down, the valves opening, crankshaft turning.