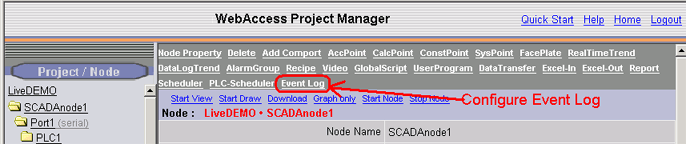
Event Logs are configured for each SCADA Node from the SCADA Node Properties Page.
figure 21.4.1 SCADA Node Properties Page
Similar in concept to a Sequence of Events Recorder, The Event log will log user-defined number of sample before the event and after the event. The data is logged to an ODBC database on the Project Node.
To configure Event Logging:
1. Log in to the Project Manager.
2. Open the SCADA Node Properties page.
3. Select the Event Log hyperlink (see above figure 21.4.1).
4. The Event Log List opens (it will be empty if this is the first Event Log ).

5. Select
Add Event Log
(or select
Update to modify an Event Log).
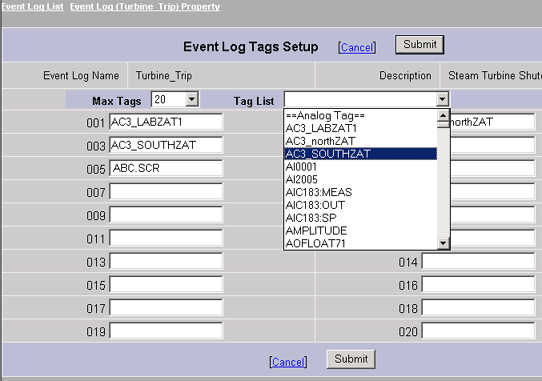
6. The first page of the Event Log opens.

7. Enter an Event Log Name (no blank spaces).
8. Optionally, enter a Description.
9. Click once on the Event Tag field, then use the pull down Tag List to select a tag.
Alternatively, you can type the tag name or copy an paste in a tag name.
The Event Tag is the tag which will cause logging to start. It can be an Analog or Discrete Tag. It can also be a Calculation Tag if you need a complex relationship to start logging.
10. Select the Event Type from the pull down list.
Event Types that will trigger logging include:
Event Tag >= Reference Value
Event Tag <= Reference Value
Event Tag >= Reference Tag
Event Tag <= Reference Tag
Record Every Sample Interval
11. If Event Tag >= Reference Tag or Event Tag <= Reference Tag is selected, then click once on the Reference Tag field then use the pull down Tag List to select a tag. Alternatively, you can type the tag name or copy an paste in a tag name.
12. Enter a Deadband. This is the Percent of Span that is considered big enough to start logging.
13. Enter a Sample Interval. This is the frequency of logging.
Note - the Sample Interval is a function of this entry and the specified Scan Time for the communication port and the effective Scan Time (e.g. how fast the PLC or IO actually can be polled or scanned).
14. Enter the Number of Sample before the Event to be recorded. This is to see what lead up to the event and helps to diagnose what caused the event.
15. Enter the Number of Samples After the Event to be recorded.
16. Select the Tags to Log button. The second page of the Event Log opens (Event Boiler
17. Select the 001 field, then use the pull down Tag List to select a tag. Alternatively, you can type the tag name or copy an paste in a tag name.
18. Repeat step 17 to add more tags.
Note - Optionally, you can also enter the name of a Script to run. This should be used with caution since it can affect system performance if fast recording of live data is also required. The names with extensions ".SCR", ".JS" or ".VBS" are treated as a script file names. When the event is triggered, the script(s) will be executed and a value "0" will be recorded in event log. The scripts should be located in the \bgr subdirectory for the project and node.
19. Use the Max Tags pulldown list to increase or decrease the number of tags from 2 to 240.
Note - Max Size will affect this one Event Log. Changing the Size of this Event Log will result in the data table being re-created to increase the number of columns. This will delete all previous data for this one Event Log the next time the SCADA Node is downloaded and restarted. A dialog box opens to warn you that changing the size of the event log will delete previously logged data.

Up to 22 Tags can be logged to a single Event Log based on the status of a single tag (the Event Tag).
Multiple Event Logs can be configured if you need multiple tags to trigger logging.
Resolution can be from 1 millisecond to 1 hour. The Actual resolution depends on you computer hardware, network connections and communications to field device (e.g. PLC.
The record time of Event Log data (i.e. ‘Record every sample period’) now aligns to 00:00:00 regardless of when the SCADA node started. For example, if you specify recording every 10 seconds, then the data will record on :00, :10, :20, :30, :40 and :50 seconds after the minute for the duration specified.