If you set your project's security mode to either Distributed – Client or Domain (LDAP), then you must also configure server settings.
When you click Server Settings in either the security system configuration wizard or the main Security System dialog, the appropriate Server Settings dialog will be displayed.
Configuring server settings for Distributed – Client
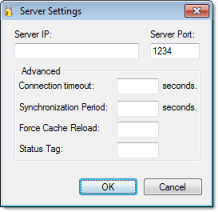
- In the Server IP and Server Port boxes, type the IP address of a runtime project that is set to Distributed – Server.
- In the Connection timeout box, type the timeout (in seconds) after which the client will attempt to reconnect to the server. (A typical connection timeout is 3 seconds.)
- In the Synchronization Period box, type the frequency (in seconds) at which the client will synchronize its security system configuration with the server's. (A typical synchronization period is 10 seconds.)
- In the Force Cache Reload box, type the name of a project tag (Integer or Boolean type). If the tag value is TRUE (non-zero) and the specified server has a timestamp older than the client, then the local security system will be updated with outdated server information.
- In the Status Tag
box, type the name of a project tag (Integer type) that will
receive server connection status codes during runtime:
Status Description 0 No cache 1 Updated cache 2 Outdated local cache 3 Outdated server cache 4 Disconnected from server - Click OK.
Configuring server settings for Domain (LDAP)
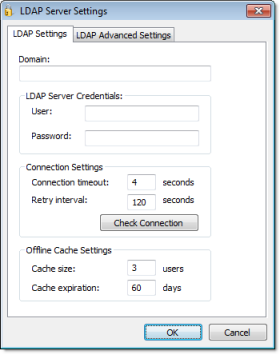
- In the Domain box, type the domain name of the LDAP server.
- In the User and
Password boxes, type your logon
credentials for the LDAP server.
Note: You must have sufficient privileges to get lists of groups and users. Please consult your LDAP administrator.
- In the Connection timeout box, type the timeout (in seconds) after which the client will attempt to reconnect to the LDAP server. (A typical connection timeout is 4–5 seconds.)
- In the Retry interval box, type the frequency (in seconds) at which the client will try to connect to the LDAP server if the connection could not be established.
- Click Check Connection to confirm that the project can connect to the specified domain. If it cannot, review and correct your settings.
- Click OK.
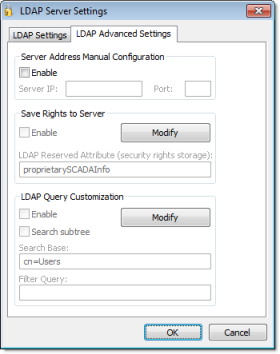
- Server Address Manual Configuration
- If for some reason the LDAP server cannot be
accessed using its domain name, then you can manually configure the
server's IP address: select Enable, and then type the IP address and port
number of the LDAP server.
Note: The default port for LDAP is 389. However, please verify the port number with the server administrator.
- Save Rights to Server
- By default, IWS security rights are saved entirely within
your project. However, you can save those rights back to the LDAP
server, either to make them available to other projects that use
the same LDAP server or for simple redundancy.
To make this option work, you must first extend the server's LDAP schema to contain additional information about the project security system. See Extending the LDAP schema to allow saving of security rights.
Once that is done, click Modify to provide your LDAP server credentials and then select Enable.
- LDAP Query Customization
- By default, the LDAP server provides a list of
all registered users and groups, so in a
large or complex network environment, that can result in an
impractically long list to manage when you're configuring your
project security system.
To restrict the list of users and groups, you may customize the LDAP query to eliminate anyone who should never have access to your project: click Modify to provide your LDAP server credentials, select Enable, and then configure the Search Base and Filter Query settings. For the proper syntax, consult the LDAP server documentation.