The Database Configuration dialog allows you to configure the necessary settings to link IWS to an external database file.
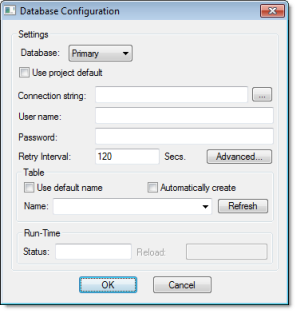
- Database
combo-box: Allows you to select either Primary or Secondary. With
Primary, all settings displayed in the Database Configuration
window apply to the Primary Database interface. Otherwise, they
apply to the Secondary Database interface. You can configure the
Secondary database in the following modes:
- Disabled: In this mode, IWS saves data in the Primary Database only. If the Primary Database is unavailable for any reason, the data is not saved anywhere else. This option may cause loss of data if the Primary Database is not available.
- Redundant: In this mode, IWS saves data in both Primary and Secondary Databases. If one of these databases is unavailable, IWS keeps saving data only in the database that is available. When the database that was unavailable becomes available again, IWS synchronizes both databases automatically.
- Store and Forward: In this mode, IWS saves data in the Primary Database only. If the Primary Database becomes unavailable, IWS saves the data in the Secondary Database. When the Primary Database becomes available again, IWS moves the data from the Secondary Database into the Primary Database.
Note: The Primary and Secondary can be different types of databases. However, they must have the same fields.Using the Secondary Database, you can increase the reliability of the system and use the Secondary Database as a backup when the Primary Database is not available. This architecture is particularly useful when the Primary Database is located in the remote station. In this case, you can configure a Secondary Database in the local station to save data temporarily if the Primary Database is not available (during a network failure, for instance).
- Use project default checkbox: When this option is checked, IWS uses the settings configured in the Default Database for the task that is being configured (Connection string, User name, Password, Retry Interval and Advanced Settings). When this option is not checked, you can configure these settings individually to the current task.
- Connection string
field: This field defines the database where IWS will write and read values
as well as the main parameters used when connecting to the
database. Instead of writing the Connection string manually, you
can press the browse button (…) and select the database type from
the Data Link Properties window.
Figure 2. Data Link Properties dialog
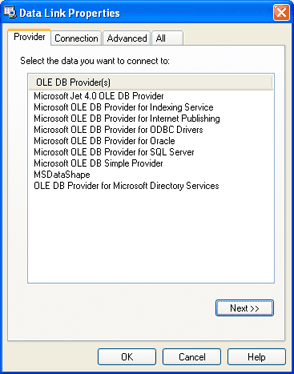
Note: The list of Database Providers shown in the Data Link Properties window depends on the providers actually installed and available in the computer where you are running IWS. Consult the operating system documentation (or the database documentation) for further information regarding the settings of the Provider for the database that you are using. - User name field: User name used to connect to the database. The user name configured in this field must match the user name configured in the database.
- Password field: Password used to connect to the database. The password configured in this field must match the password configured in the database.
- Retry Interval field: If IWS is unable to connect to the database for any reason, it retries automatically to connect to the database after the number of seconds configured in this field have passed.
- Advanced button:
After pressing this button, you have access to customize some
settings. For most projects, the default value of these settings do
not need to be modified and should be kept.
Figure 3. Database Configuration: Advanced dialog
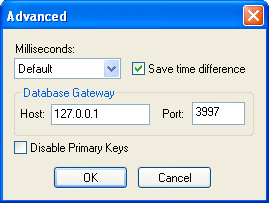
- Milliseconds combo
box: You can configure how the milliseconds will be saved when
saving the date in the database. Each database saves the date in
different formats; for example, some databases do not support
milliseconds in a Date field. The
following options are available:
- Default: Uses the
format pre-defined for the current database. The databases
previously tested by InduSoft are previously configured with the most
suitable option. When selecting Default, IWS uses the setting
pre-configured for the current database type. If you are using a
database that has not been previously configured, the Default
option attempts to save the milliseconds in a separate field.
Tip: The default option for each database is configured in the StADOSvr.ini file, stored in the \BIN sub-folder of IWS. See Studio Database Gateway for information about how to configure the StADOSvr.ini file.
- Disable: Does not save the milliseconds at all when saving the date in the database.
- Enable: Saves the milliseconds in the same field where the date is saved.
- Separate Column: Saves the milliseconds in a separated column. In this case, the date is saved in one field (without the milliseconds precision) and the number of milliseconds is saved in a different column. This option is indicated where you want to save timestamps with the precision of milliseconds but the database that you are using does not support milliseconds for the Date fields.
- Default: Uses the
format pre-defined for the current database. The databases
previously tested by InduSoft are previously configured with the most
suitable option. When selecting Default, IWS uses the setting
pre-configured for the current database type. If you are using a
database that has not been previously configured, the Default
option attempts to save the milliseconds in a separate field.
- Save time difference checkbox: When this option is checked (default), IWS saves the Time Zone configured in the computer where the project is running in each register of the database. This option must be enabled to avoid problems with daylight savings time.
- Database Gateway: Enter the Host Name/IP Address where the IWS Database Gateway will be running. The TCP Port number can also be specified, but if you are not using the default, you will have to configure the IWS Database Gateway with the same TCP Port. See the Studio Database Gateway section for information about how to configure the advanced settings for the IWS ADO Gateway.
- Disable Primary Keys: For some modules, IWS will try to define a primary key to the table in order to speed up the queries. If you are using a database that does not support primary keys (e.g., Microsoft Excel), then you should select (check) this option
- Milliseconds combo
box: You can configure how the milliseconds will be saved when
saving the date in the database. Each database saves the date in
different formats; for example, some databases do not support
milliseconds in a Date field. The
following options are available:
Table Pane
This area allows you to configure the settings of the Table where the data will be saved. All tasks can share the same database. However, each task (Alarm, Events, Trend worksheets) must be linked to its own Table. IWS does not check for invalid configurations on this field, therefore you should make sure that the configuration is suitable for the database that you are using.
- Use default name checkbox: When this option is checked (default), IWS saves and/or retrieves the data in the Table with the default name written in the Name field.
- Automatically create checkbox: When this option is checked (default), IWS creates a table with the name written in the Name field automatically. If this option is not checked, IWS does not create the table automatically. Therefore, it will not be able to save data in the database, unless you have configured a table with the name configured in the Name field manually in the database.
- Name: Specifies
the name of the Table from the database where the history data will
be saved.
Tip: To specify a sheet in a Microsoft Excel spreadsheet file, use the following syntax:
[sheetname$]
- Refresh button: If the database configured is currently available, you can press the Refresh button to populate the Name combo-box with the name of the tables currently available in the database. In this way, you can select the table where the history data should be saved instead of writing the Table name manually in the Name field.
Run-Time Pane
This area allows you set runtime values. The following fields are available:
- Status (output)
checkbox: The tag in this field will receive one of the following
values:
Value Description 0 Disconnected from the database. The database is not available; your configuration is incorrect or it is an illegal operation. 1 The database is connected successfully. 2 The database is being synchronized. - Reload (output): Specify a reload tag if you are using curly brackets in any of the configuration fields. When you want to reconnect to the database using the updated values on your tags, set the tag on this field to 1. IWS will update the configuration when trying to perform an action in the database, setting the tag back to 0 when it is finished.
See also: