IWS assigns a unique identification number (ID#) to every object on the screen. These ID#s always start at zero and range up to the total number of objects on the screen. You can click on an object to display its ID# in the status bar.
IWS uses ID#s to determine whether an object displays in front of, or behind, another object on the screen. Objects with lower ID#s display behind objects with higher ID#s.
Use the following object layer tools to move selected object(s) behind or in front of another screen object(s).
Note: You can
use these tools only with a single selected object or group of
objects. You cannot use these tools with multiple objects selected.
Also, if you select a group of objects and move them the behind or in front of another object, then the selected group of objects maintain their original display order.
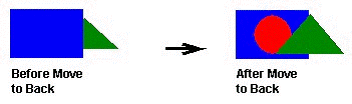
Click the Move to
back tool to move a selected object or objects behind all
other objects on the screen. IWS assigns the object the lowest ID# and moves
that object behind all other objects on the screen.
Figure 1. Moving
Objects to Back
Note:
Alternatively, right-click on an object and select Move to back from the object's shortcut
menu.
Click the Move to
front tool to move a selected object or objects in front of
all other objects on the screen. IWS assigns the object the highest ID# and moves
that object behind all other objects on the screen.
Figure 2. Moving
Objects to Front

Note:
Alternatively, right-click on an object and select Move to front from the object's shortcut
menu.