To create a new class tag:
- From the Global tab, right-click the Classes folder and then select Insert Class from the resulting shortcut menu.
- When the Insert
Class dialog displays, type a name into the Name text box using the design guidelines and tag name syntax.
Figure 1. Insert Class dialog
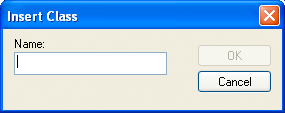
- Click OK to close
the Insert Class dialog.
The Class: worksheet is
displayed automatically.
Configure the columns in this worksheet as follows:
- Name field: Type a class member name.
- Type drop-down list: Click the arrow to select the class member's data type (Boolean, Integer, Real, or String) from the list.
- Description field (optional): Type a description of the class member (for documentation purposes only).
Figure 2. Sample CTank worksheet
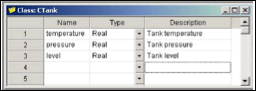
- Click in the next blank line and provide the
information for the next class member you want to include in this
class. Or, if you are finished adding members, you can close the
Class worksheet.
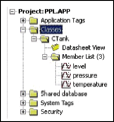
You can expand the Classes folder and subfolders to see the data structure:Figure 3. Expanded Classes folder
- Next, use the instructions provided in "Adding Tags to the
Datasheet" to create and associate a tag with the new class.
Note that when you click the arrow button to view the Type list, your new class name (CTank) is included (see line 5 in the following figure). Select the class name from this list.
Figure 4. Creating the Tank Class Tag
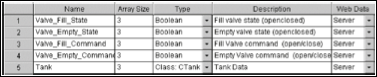
- When you are done, save your work and close the worksheet.