One of the most powerful features that the Alarm Analysis object provides is the ability to filter alarms. By filtering alarms, you can eliminate low priority or insignificant alarms, and focus the user's attention to the most severe or important alarms. For example, you could filter on all high priority alarms or display alarms from a specific alarm area.
In order for the Alarm Analysis object to filter alarms, you must create a filter condition. This condition defines the alarms you want to display. After you create the condition, the Alarm Analysis object displays the alarms that match the selected criteria.
NOTE: The Date In, Date Last, Time In and Time Last columns are not datetime data types; the Native Date/Time in and Native Date/Time Last columns should be used for filtering instead.
You can create a filter condition by selecting a column from the object's spreadsheet that you want to filter on, a value, and a relational or comparison operator. The exact type of operator depends on the selected column. The following table lists the relational and comparison operators you can select.
|
Relational Operators |
Comparison Operators |
|
= (equal to) NOTE: When the = operator is used with a date/time, the time must be entered to the 100th of a second (e.g., 1:01:55.700 PM). You can change the time format if necessary in the Edit User Preferences dialog box. See Setting user preferences. |
In |
|
<> (not equal to) |
NotIn |
|
> (greater than) |
> |
|
< (less than) |
< |
|
>= (greater than or equal to) |
>= |
|
<= (less than or equal to) |
<= |
Comparison operators let you determine if an alarm is from a specific alarm area or SCADA server. The following table lists several sample filters.
|
The filter... |
Displays alarms... |
|
Alarm Area In "LA-Line1" |
From the alarm area LA-Line1. |
|
Alarm Area NotIn "LA-Line1" |
From any alarm area except LA-Line1. |
|
Native Date/Time In < "2003-09-01" |
From any alarm time older than September 1, 2003. |
For example, suppose you want to display all the alarms with an alarm priority of High. To do this, you would:
On the Alarm Analysis Configuration panel's Filter tab, select the Alarm Priority column.
Click the Add Filter button. The Add Alarm Priority dialog box appears.
Select the relational operator Equal to (this is the default operator).
From the Value drop-down list, select HIGH.
Click OK.
The Alarm Analysis object adds the following condition in the Display Alarms Where (filter conditions) list:
Alarm Priority = "HIGH"
If the filter you are adding allows you to enter a value to complete the filter condition, you can specify wildcards in the text you enter. A wildcard is a character that represents one or more other characters. For example, entering the following filtering condition lets you display only tags that start with A:
Tag Name = "A*"
The following wildcards are supported in the Alarm Analysis object:
* – represents one or more characters. For example, the string B* matches all of the following strings: Blue, Ball, Beach, Beautiful, and Blissful.
? – represents one character. For example, the string B?e matches the strings, Bee and Bye.
Other buttons you can use when creating filters include:
Add – adds a new filter condition. For more information, refer to Multiple Filters.
Insert – inserts a new filter above the selected filter condition.
Modify – changes an existing filter condition.
Remove – deletes an existing filter condition.
( – inserts an opening parenthesis at the start of the filter condition.
) – inserts a closing parenthesis at the end of the filter condition.
X( – removes an opening parenthesis from a filter condition.
X) – removes a closing parenthesis from a filter condition.
NOTE: Grids can only be filtered on columns that are displayed.
Alarm Analysis filter parameters are used in much the same way other parameters are used in Proficy Portal. You can set a parameter on a specific column and use the parameter to link to the Alarm Analysis object with another object, such as a Combo Box, List Box, Text Box, Time Component, Tree, or Event chart. The object that links to the Alarm Analysis object can be set up with the column that the parameter is set for, so that when the user selects a value in the object, the Alarm Analysis grid is filtered accordingly.
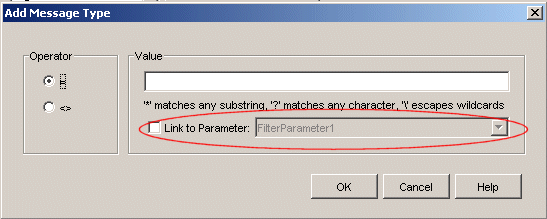
Ten filter parameters are available for columns that are not time-based, and four filter parameters are available for time-based columns. When you Add or Insert a filter for a column, on the Add [Column Name] dialog box you will see a Link to Parameter check box and a drop-down list that allows you to select the filter parameter to assign (as shown in the following figure).
After you have selected the parameter, the filter parameter is set and you can use the parameter to link another object to the Alarm Analysis object. Refer to Parameter Connections for more information on how to use parameters to link objects.
Additionally, you can specify a default parameter value for any of the filter parameters. For example, if you set a filter parameter on the Message Type column, you can set a default value such as `ALARM' or `TEXT', so that when the Alarm Analysis object is run, the data is filtered according to that parameter value. If an object such as a list box is linked to the Alarm Analysis object with the Message Type filter parameter, the user can still select any value from that column (in the list box) to filter the Alarm Analysis object by that particular column. Default values for parameters are set on the Filter tab of the Alarm Analysis Configuration panel by clicking the Edit Default Parameter button.
Filter parameters can be used in a number of ways. Refer to the following for examples.
Parameters Example #1
End result: when the user selects a start and end time, the alarm data is shown for the time period specified.
Configuration details:
Configure the Alarm Analysis object with an alarm data source.
On the Filter tab, set Native Date/Time In and Native Date/Time Last as parameters. The filters should appear as "Native Date/Time In >= FilterParameterStartDate AND Native Date/Time Last <= FilterParameterEndDate" (or something similar). Change the default values for the parameters in the Default Filter Parameters dialog box, if required.
Insert a Time Component object into the display. Configure the Time Component to use start and end times.
Link the Time Component object to the Alarm Analysis object by using the Link Property to option. Link the StartDateTime property to the FilterParameterStartDate parameter, and the EndDateTime property to the FilterParameterEndDate parameter.
Switch to Run mode. When you select the start and end times (and click the Refresh button) on the Time Component object, the time appropriate data is shown in the Alarm Analysis object.
Parameters Example #2
End result: when the user selects a tag name from a list of tag names, the Alarm Analysis displays alarms data for the selected tag.
Configuration details:
Configure the Alarm Analysis object with an alarm data source.
On the Filter tab, set the Tag Name column as a parameter. The filter should appear as "Tag Name = FilterParameter1" (or something similar).
Insert a Combo box control into the display and set the data source for the Combo box as the Tag Name column from the Alarms source.
Link the Combo box to the Alarm Analysis object by using the Link Property to option. The Selected Item property should be linked to the FilterParameter1 parameter.
Switch to Run mode. When you select a tag name from the combo box, the Alarm Analysis object shows alarms data for the selected tag.