From the Project Manager
1. Select your Project and the SCADA Node.
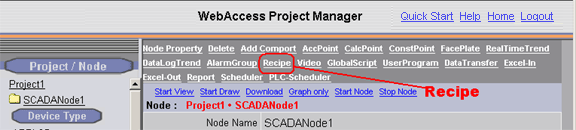
Figure 13-11 Recipe configuration - SCADA Node main page
2. Click the Recipe hyperlink from the SCADA Node main page (bwMain.asp).
3. The Recipe List page opens.

Figure 13-12 Recipe List - Project Manager
4. Select either Add Recipe File or Update.
5. The Add/Update Recipe page opens.
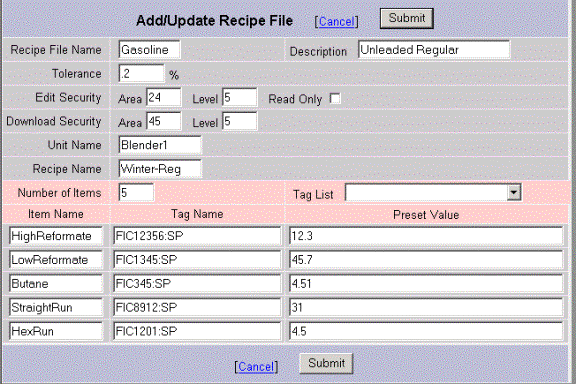
Figure 13-13 -ADD/Update Recipe
6. Recipe File Name. Enter a name that will appear in dialog boxes and displays in run-time View.
7. Tolerance. Enter a numeric value (in % of full scale) that will generate a recipe error after download. Tolerance is in % of full scale (SpanHi - SpanLo.) A zero value means that the tag must match the preset exactly. Tolerance is used to account for the variation in the representation of numbers in the field device (e.g. 12-bit devices), the accuracy of IO and the conversion to/from engineering units. For example, if you download a 1.9 to some devices, round-off or other representation errors will result in a 2.0 reported.
8. Edit Security. Enter the Area and Level required of a User to change a preset value in this recipe. Read Only prevents all users from changing the preset values in a recipe. Read Only allows users and operators to download the recipe, but not edit it. This applies to all recipes in this recipe file.
9. Download Security. Enter the Area and Level required of a User to download this recipe to field device. This applies to all recipes in this recipe file.
10. Unit Name. The Unit can be any name, but usually corresponds to a physical device (for example MixTank1, MixTank2, MixTank3 etc.) Equipment Lineup and Process Unit are other terms for Unit. The Unit will consist of a group of tags. When Operators or Users select the Unit in Run-time, the Tags to be downloaded will change to those associated with this unit. There can be multiple units assigned to the same recipe file allowing the same recipe to be used by different groups of tags. By defining multiple Units, the same recipe can be downloaded to different groups of tags by operators and users. In selecting a recipe, operators select the recipe and unit to download.
11. Recipe Name. A recipe is a group of Preset Values. This allows dozens or hundreds of tags to be changed with a single button push. These can be numbers or text. Operators and users during run-time will select the desired recipe to download. A recipe contains the list or pre-set values defined by an engineer that will be downloaded using a single button push.
Multiple recipes are the most common usage. For example, if you are mixing paint, each recipe might represent a different color of paint. The Pre-set Values will the amounts of each component color used to make the final color.
12. Number of Items. The number of items in the recipes and units in this recipe file. To add more Items to your recipe, increase this number and press submit.
13. Item Name. Enter a descriptive name to help understand the tags in the recipe. Item names are usually ingredient names. Tag names are usually structured (like FI101:SP). Item Names are usually descriptive (Flour, Water, Blue Dye, Red Dye, etc). The item names remain the same for all recipes in a recipe file. The tag names will change depending on the Unit selected. The pre-set values will change depending on the Recipe selected.
14. Tag Name. These are the physical IO tags that are associated with this recipe process Unit. For example, if the Unit is Tank1, then all the tags would normally be IO tags associated with Tank1 in the field.
These can be Analog, Discrete or Text tags, IO tags, Block Tags, Constant Tags even calculation or accumulation tags. For Block tags, the full name must be specified (Blockname:parameter).

15. Tag List - Tag Names can be selected from a Pull Down List or typed.
16. Preset Value. Enter the value that will be downloaded to the tag for the selected unit.
The Pre-set value should match the Tag type (don't download a text value to an analog or discrete. Entering a text value as the Pre-set for an analog or discrete will result in a 0 (zero).
Discrete values should have a 0, 1, 2, 3, 4, 5, 6 or 7 entered as the preset in the project configuration manager. The State Descriptor will appear on the Run-time View display (e.g. run, stop, true, false). For a 2-state discrete, any value greater than one will be treated as a 1. Similarly, for 4, 6 and 8 state discrete tags: any value greater than the maximum state will be treated as the maximum state.
17. Submit. Press submit to enter the data changes. Press cancel to abort any changes. Delete will delete the entire recipe file including all units and all recipes in that file.
18. There are two ways to download these changes to the SCADA Node (this will not download to the PLC or field device):
Note - a User in VIEW or ViewDAQ must download the Recipe to the PLC or Field device.
18a. Download and Restart the SCADA node from the SCADA Node properties page. If you have never downloaded the SCADA node before, then this is required. This will temporarily stop the SCADA node (if it is running).
OR
18b. Use the Download hyperlink on the Recipe List Page (figure 13.12 above). This will download changes to the Key Mapping without stopping the SCADA node.