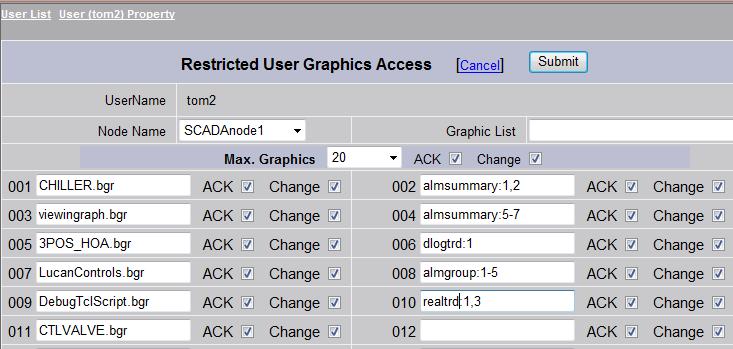
Twenty (20) additional user-built graphics (*.bgr) can be assigned to a Restricted User. The ability to Acknowledge Alarms with the ACK button or Change the value of Tags can also be restricted or enabled for each Graphic Display. Follow the steps to Add or Update a User in the preceding section to add the user and a Default Graphic.
Figure 8.8 Graphic Page Access - Restricted User ACK and Change
22. For the Default Graphic, uncheck ACK to disable the ability to Acknowledge Alarms on the Default Graphic Display.
23. Uncheck CHANGE to disable the ability to Change any Tag on the Default Graphic display.
Note - Area and Level security still applies if Change is enabled (checked). If CHANGE is enabled, the restricted user must be assigned a security Level and Area appropriate for the tag in order to change it.
24. To assign additional Graphic Displays (up to 20 additional), click the Numbered Field (01, 02, ... 20) with the mouse.
25. Click the Graphic List (Figure 8.7) to view a list of all graphic displays (*.bgr)
26. Select a graphic.bgr from the list by clicking on it. Alternatively, you can type the name of a Graphic Display that you plan to build in the future.
27. Press Submit when you are finished.
28. The User account will become active (and any changes made) after you Download the SCADA Node.
Alarm Summary limited to assigned Areas, can be assigned to Restricted Users. This feature allows a Restricted Users to see and acknowledge only alarms associated with Tags assigned to specific Areas. The “Area” is the “Security Area” assigned to the tag in tag properties. The “Areas” are then assigned to the Restricted Users using the “Graphic Page Access” in User Security. The format in the “Restricted User Graphics Access” is:
almsummary:Area Number, Number2, Area n
For a continuous range of Security Areas, the format is:
almsummary:Area Number-Area Number n
For example, to assign the alarm summary for Areas 1 and two, the graphic page entry be: almsummary:1,2
Only tags assigned to Security Areas 1 and 2 will show in the alarm summary with the above example.
For example, to assign Areas 10 through 17, the graphic page entry would be: almsummary:10-17
Only tags assigned to Security Areas 1,2, and 10 through 17 will show in the alarm summary with the above two examples entered in the Restricted User Graphics Access.
The “Acknowledge All” button will not work for a Restricted User. Acknowledge Screen and Acknowledge Tag will work. The Alarm Summary has all these buttons and can be edited to remove them by editing the almsum.dxx and saving as almsum.bxx
Data Log Trend Groups can be assigned to Restricted Users. The format in the “Restricted User Graphics Access” is:
dlogtrd:Group Number, Trend Group Number2, Trend Group Number n
For a continuous range of Security Areas, the format is:
dlogtrd:Trend Group Number-Trend Group Number n
For example, the format to assign a Data Log Trend Group 2,3 and 5 to restricted user is: dlogtrd:2,3,5
Only Data Log Trend Groups 2,3 and 5 can be viewed using the above entry in Restricted User Graphics Access.
For example, tTo Assign a range of Data Log Trend groups (10 to 17): dlogtrd:10-17
The “Change Value” pushbutton will only work if the User is assigned to the Area that matches the Security Area and Security Level of the tag (i.e. the user may be allowed to view the tag, but not change it).
Similar to the above, Real Time Trend Groups, Alarm Groups and Faceplate Groups can be assigned toassigned to Restricted Users.
The format in the “Restricted User Graphics Access” is:
realtrd: Group Number, Group Number2, Group Number n
almgroup:Group Number, Group Number2, Group Number n
fplgroup:Group Number, Group Number2, Group Number n
For a continuous range of Security Areas, the format is:
realtrd:Trend Group Number-Trend Group Number n
almgroup:Alarm Group Number-Alarm Group n
fplgroup: Faceplate Group Number- Faceplate Group Number n
Examples to assign Groups 2,3 and 5 to restricted user are:
realtrd:2,3,5
almgroup:2,3,5
fplgroup:2,3,5
To Assign a range of groups (10 to 17):
realtrd:10-17
almgroup:10-17
fplgroup:01-17
The “Change Value” pushbutton will only work if the User is assigned to the Area that matches the Security Area and Security Level of the tag (i.e. the user may be allowed to view the tag, but not change it).