On the Graphics
tab, in the Shapes group, click
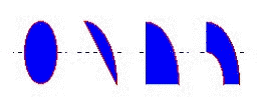
Ellipse to draw ellipses, chords,
arcs, and rings (see the following figures).
Figure 1. Ellipse,
Chord, Arc, and Ring


Tip: The
Ring style is particularly useful when you
are creating plumbing drawings.
To create an ellipse, use the following steps:
- Click in the drawing area and drag the mouse/cursor to create an ellipse shape.
- Release the mouse button to stop drawing the ellipse.
- Use the Object Properties dialog to change the shape to a chord, arc, or ring.
- Double-click on the object to view the Object Properties dialog.
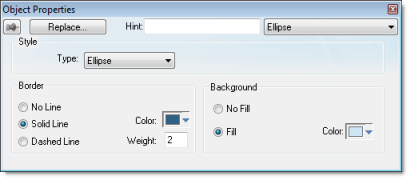
Figure 2. Object Properties: Ellipse

Use the Object
Properties dialog to specify the following parameters for
the ellipse:
- Style: Specify the
object style by selecting Ellipse, Arc, Chord,
or Ring from the drop-down list.
Next, select Left-Bottom,
Left-Top, Right-Bottom, or Right-Top from the Style list to choose the quadrant into which
the ellipse is drawn.
For example to represent a half-circle pipe, create two Ring objects. Specify one as Left-Bottom and the other as Right-Bottom then join the two objects to create a half-pipe.
- Fill: To specify
whether the ellipse is filled, click No
Fill or Fill.
If you select the Fill option, specify a fill color by clicking on the Color button. When the Color dialog displays, click on a color to select it and close the dialog.
- Line: Specify a line style for the ellipse border by clicking the No Line, Solid Line, or Dashed Line button.
- Color: Specify the ellipse borderline color by clicking the Color button to open the Color dialog. Click the color to select it, then close the dialog.
- Weight: Specify a line width for the ellipse border by typing a number representing the line width (in pixels) into the text box provided.