|
Class attribute configuration overview. |
|
|
Class attribute configuration steps. |
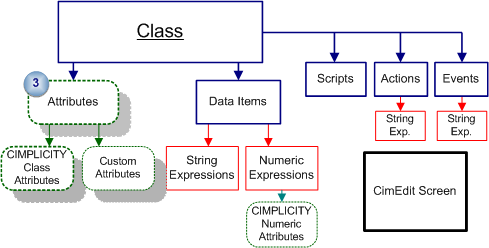
Class Attribute configuration overview
There are two types of class attributes, CIMPLICITY Attributes and Custom Attributes.
A class developer can enter values for these attributes, which will serve as default values. The object designer can, in some instances, override the default value.
Class attributes can be used to drive the way that objects are created or to store information.
![]() Note: CIMPLICITY also provides numeric
data item attributes that can be used for numeric expressions.
Note: CIMPLICITY also provides numeric
data item attributes that can be used for numeric expressions.
When you create an attribute, you can specify the:
![]() Instantiation Type for each
attribute. Your specification controls an object designer's options
when creating an object. If the attribute is:
Instantiation Type for each
attribute. Your specification controls an object designer's options
when creating an object. If the attribute is:
|
Required |
A user must provide a value for this attribute. Failure to provide the value will cause object instantiation to fail. |
|
Optional |
The attribute has a default value in the class, which the user can override for the object being created. The attribute does not have to be explicitly specified to create the object. |
|
Static |
|
|
Static Display |
|
![]() Tabs and layout for the
Object dialog box in which a object designer enters the
information.
Tabs and layout for the
Object dialog box in which a object designer enters the
information.
Class attributes include:
![]() CIMPLICITY class
attributes, which display in the Attributes tab of the Class dialog
box. CIMPLICITY class attributes can be edited, duplicated, or
deleted as needed to configure your class.
CIMPLICITY class
attributes, which display in the Attributes tab of the Class dialog
box. CIMPLICITY class attributes can be edited, duplicated, or
deleted as needed to configure your class.
![]() Custom attributes that you
configure to meet class requirements.
Custom attributes that you
configure to meet class requirements.
Class attributes configuration steps
|
Review standard CIMPLICITY class attributes. |
|
|
Create a custom attribute. |
|
|
Configure a class attribute. |
|
|
Configure the attribute's field for the Object dialog box. |
|
|
Class configuration steps. |