1. Start Scheduler from Project Manager, VIEW or ViewDAQ.
2. From the Holiday page, create at least one holiday schedule. It can be blank. The Holiday Schedule defines “exceptions” to the 7 day per week schedule. The "Holiday" is any unusual event or series of events. The Holiday Schedule can be defined, redefined and assigned at any time, but usually is defined first to allow easy assignment to the Time Schedules as the "exception" to the schedule.
a. Enter a name for the Holiday Schedule.
b. Enter a Group Number.
c. Press submit.
3. Select Time.
4. On the Time Group page, define the Time Schedules. These are the START TIME and STOP TIME for Normal and Extra Hours for a weekly schedule. A single "Holiday Schedule Group" is assigned to each Time Schedule.
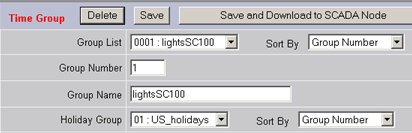
Figure 18.11 Time Group Number, Name and Holiday
a. Enter a Time Group Number.
b. Enter a name the Time Group.
c. From pull down list, select Holiday Schedule.
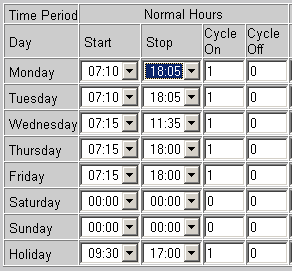
Figure 18.12 Time Group - Normal Hours
d. Under Normal Hours, use the pull down list to select Start and Stop times (Monday through Sunday and Holiday).
e. Enter 1 under Cycle ON and leave 0 as Cycle Off if value is continuously ON.
f. Repeat for Extra Hours, Extra Hours II and default cycle if there are multiple scheduled per day. (See Time for more detailed information)
g. Press submit.
5. Select Equipment Group.
6. Define Equipment Groups by:
a. Enter Group Number
b. Enter a Name
c. Select a Time Group (a Schedule) from the pull down menu.
d. Press submit.
7. Select Circuit Group
8. Define Circuit Groups. These are "Tags" that will always share the same Schedule.
a. Enter a Name for the Circuit Group.
b. Accept 0 or enter a Circuit Group Number.
c. Select an Equipment Group from the pull down menu. The Equipment Group associates a Time Group (a Schedule) with this Circuit and, optionally, the same time group/schedule with other circuits.
d. Select a field under Tag Name.
e. Select the Tag List.
f. Scroll down list to find desired Tag.
g. Click once on the Tag in Tag List.
h. Repeat for other Tag Names.
i. To increase the number of tags, modify the Max Tags field.
j. Press submit.
9. Download the Schedules to the SCADA node. You can download the SCHEDULER without stopping the SCADA node. The new schedule will take effect immediately. If a tag is supposed to be ON, it will be set to the ON value.