Use the Alarm/Event Control tool to add an Alarm or Event Control object to an project screen.
- On the Graphics tab of the ribbon, in the Data Objects group, click Alarm/Event Control.
- Click in the display, and drag the mouse to create and adjust the object's shape.
- Double-click on the object to open the following
Object Properties dialog.
Figure 1. Object Properties: Alarm/Event Control
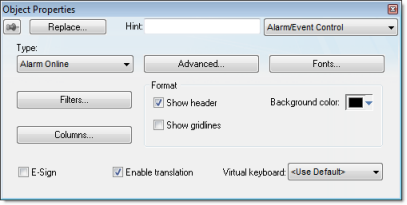
You can use this dialog to specify the following parameters:- Select an alarm object mode in the Type pane:
- Alarm Online: Display only current alarm messages.
- Alarm History: Display only alarm messages from the Alarm History database.
- Alarm History + Event: Display both alarm messages from the Alarm History database and logged events from the Event History database.
- Event: Display only logged events from the Event History database.
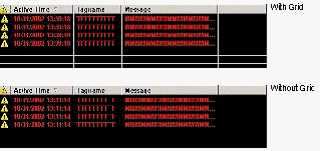
- Click (enable) the Show
gridlines checkbox to display gridlines in the object.
Figure 2. Displaying a Grid
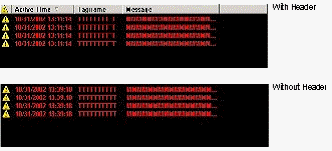
- Click (enable) the Show
Header checkbox to display a header on the object.
Figure 3. Displaying a Header
- Use the Win color box to select a background color for the object. Click the color box to open the color palette pop-up, then simply click a color to select it.
- Click (enable) the Ext translation checkbox to enable the external translation of messages using the Translation Tool. (See The Translation Tool for more information.)
- E-Sign checkbox: When this option is checked, the user will be prompted to enter the Electronic Signature before executing the animation.
- VK: Virtual Keyboard type used for this object. You need to select the Virtual Keyboard option in the Viewer settings (Viewer on the Project tab of the ribbon) before configuring the Virtual Keyboard for this interface.
- Select an alarm object mode in the Type pane:
Fonts
Click the Fonts button to open a standard Fonts interface where you can specify display properties for the message text.
Columns
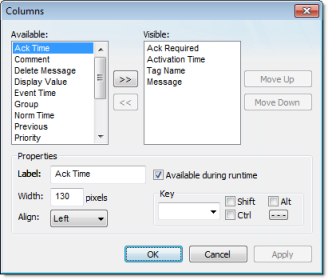
- The Available
list contains all of the column types available for this object.
The Visible list contains all
of the column types currently in use for the object.
Click the » and « buttons to move selections between the two lists.
Tip: You can configure an Alarm Control object to display recently replaced values together with their new values. To do so, move both Value and Previous to the Visible list.Click the Move Up or Move Down buttons to rearrange the order of columns in the Visible list.
- Use the Label and Width fields in the Properties pane to change the default column labels and widths at runtime.
- Use the Align combo box to specify alignment (Left, Center, or Right) for the alarm message text within a specified column.
- Click (enable) the Available during runtime checkbox to allow the user to add selected columns to the visible list during runtime.
- Use the Key box to assign a shortcut to each column. This allows you to sort the information on the Alarm Control object by any column, using keyboard keys instead of the mouse cursor.
When you are finished, click OK to close the Column dialog.
Filters
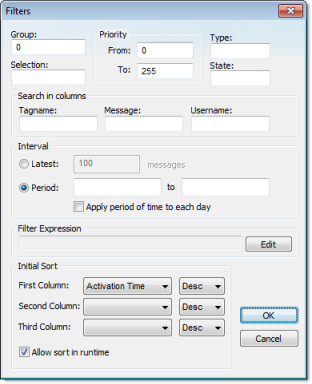
- Use the Group field to filter messages by the Alarm Worksheet number. The worksheets are organized in the Alarms folder, in the Tasks tab of the Project Explorer, starting with 1. If you specify a Group of 0, then all of the worksheets will be displayed. You can use commas or dashes to specify a range of groups; for example,1,3,5-6.
- Use the Selection field to filter messages by the Selection text configured on the Alarm Worksheet.
- In the Priority pane, use the From and To fields to filter messages by the Priority configured on the Alarm Worksheet. Type numerical values into the these fields to delimit the priority range.
- Use the Type field to filter messages by the alarm type (e.g., HiHi, Hi, Lo, LoLo, Rate, Dev+, Dev-). You can use commas to specify more than one type; for example,HiHi,LoLo.
- Use the State
field to filter messages by the alarm status:
Value Description 0 All alarms (default) 1 All active and unacknowledged alarms 2 All active and acknowledged alarms 3 All inactive and acknowledged alarms 4 All inactive and unacknowledged alarms Leaving this field blank is effectively the same as entering a value of 0.
- In the Search in columns pane, use the Tagname, Message, and/or Username text fields to specify criteria for filtering messages. Type a tagname, message, and/or user name into the text field for which you want IWS to search.
- Use the parameters in the Interval pane to filter messages by the
last x messages (Latest) or based on a period of time
(Period). If you do not specify
any interval at all, then only the alarms for the current day will
be displayed.
Note:
- You can specify String tags in curly brackets (e.g.{tagname}) in the Group, Selection, Tagname, Message, and Username fields, to change these values during runtime.
- You must specify String tags without curly brackets (e.g.tagname) in the Type field and the Period fields of the Interval pane. These fields cannot take values directly.
- You can specify Integer tags in the From and To fields Priority pane, the State field, and the Latest field from the Interval pane.
- You can use wildcards ( * and ? ) when specifying values for the Selection, Tagname, Message, and Username fields.
- Use the Filter
Expression pane to configure an expression that will filter
unwanted messages out of the display. Only messages that satisfy
the expression will be shown.
To enter an expression, click on the Edit button; the Alarm Filter Expression dialog is displayed. The filter expression must follow the basic syntax of…
[Column Name]Comparison Operator'Value'
…where the Column Name is the name of a column in the Alarm/Event Control object. For example:[Activation Time]>'08/17/2007 15:00'
This filter will only show alarm messages with activation times greater (later) than 15:00 on 08/17/2007.
Note:- The maximum number of characters is 1024 for Engineering Mode and 2048 for Runtime Mode.
- The Display Value and State columns are not supported by the filter expression.
Tip:- You can combine several conditions simultaneously by
using the logic operators AND, OR, and NOT. For example:
[Type]='HiHi' OR [Type]='LoLo' AND [Activation Time]>'08/17/2007 15:00'
- You can use wildcards (* and ?) in the filter expression.
- It is not necessary to use the square brackets when the Column Name is only one word (e.g., Value).
- You can change the filter expression during runtime
by specifying String tags in curly
brackets. For example:
[Value]='{AlarmFilterValue}' - To use more than 1024 characters in the filter expression during runtime, you must use more than one tag between curly brackets using the {TagName1} AND {TagName2} syntax.
- Use the parameters in the Initial Sort pane to set the default
sorting order. Select a sort type from the Column combo-box, and then select
Asc or Desc to sort in ascending or descending
order. You can configure up to three levels of sorting.
Note: If you configure all three levels with sort types other than Activation Time, then the project will automatically sort on a fourth level according to Activation Time, in descending order.You cannot change the type of this fourth-level sort, but you can toggle its default order — from descending to ascending — by manually editing your project file (project_name.app) to change the following setting:
[Objects]
DescendingAlarmListTime=TRUE or FALSE
TRUE sorts in descending order, FALSE sorts in ascending order. Please note that this setting only works for projects created with or updated to InduSoft Web Studio v6.1+SP5 or later.
Click the Allow sort in runtime checkbox if you want to allow the user to change the sort order during runtime.
Advanced
Click the Advanced button to open the Advanced dialog where you can specify advanced properties for the Alarm Control object.
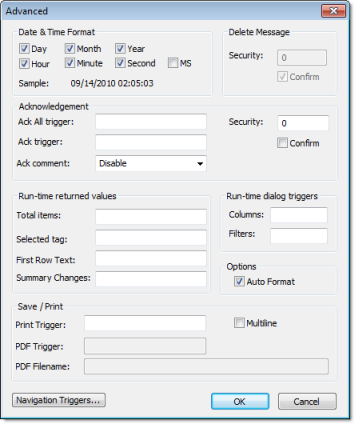
- Use the parameters in the Date & Time Format pane to control
which date and time information displays in the alarm message.
Click (enable) a checkbox to include that element in the display.
Note: MS stands for milliseconds.
Tip: Watch the Sample text to preview how the information will look in the alarm message.
- Use the parameters in the Ack pane to control how alarms are
acknowledged.
- Security field: Type a numeric value to specify which security level can acknowlege an alarm message. Only those users with the specified level can respond.
- Ack All trigger field: Type a tag to receive a value. When the tag changes value, it indicates that all messages in the alarm object have been acknowleged.
- Ack trigger field: Type a tag to receive a value. When the tag changes value, it indicates that the message at the top of the alarm object has been acknowleged.
- Confirm checkbox: Click (enable) this box to display a confirmation dialog when the user tries to acknowledge a single alarm.
- Enable comment (individual ack only) checkbox: Click (enable) this box to allow the user to enter comments about the alarm, just after acknowledging it.
- Use the parameters in the runtime dialog triggers pane to contol
- Columns field: Type a tag to receive a value. When the tag changes value, it opens a dialog allowing the user to customize the columns visible in the object.
- Filters field: Type a tag to receive a value. When the tag changes value, it opens a dialog allowing the user to filter the columns visible in the object.
- Use the parameters in the Delete Message pane to control who can
delete alarm messages from the Alarm History:
- Security: Use this field to specify which security level can delete alarm messages. Only those users with the specified security level will be allowed to delete an alarm message.
- Confirm: Click (enable) this box to require the user to confirm a message deletion before IWS actually deletes the selected alarm message.
- Print Trigger: When the tag configured in this field is toggled, the current state of the Alarm/Event Control object is sent to the default printer.
- PDF Trigger field: When the tag configured in this field is toggled, the current state of the Alarm/Event Control object is saved as a PDF file at the location specified by PDF Filename.
- PDF Filename
field: Enter a complete file path and name where the PDF file is to
be saved. You can also enter a tag name using the {tag} syntax.
Note: PDF Trigger and PDF Filename are not supported in projects running on Windows Embedded or Thin Client.
- Multiline checkbox: When this option is checked, the print output or PDF will be formatted according to the available column space, and the text within each cell will be wrapped so that all of it is shown.
- Total items field: Type an integer tag to see how many alarms remain after IWS filters the alarm object using parameters specified on the Filters dialog.
- Auto Format checkbox: When checked, decimal values in the Display Value, Previous and Value columns will be formatted according to the virtual table created by the SetDecimalPoints() function.
- Selected tag field: Type a string tag to enable the end user to click on an alarm message to see the name of the tag associated with that alarm event.
- First Row Text field: Type a string tag. This tag will receive the text of all fields from the first row of the Alarm/Event Control. The fields are tab delimited. Whenever the first row changes — either due to a new Alarm/Event, or simply because the rows are reordered — the value of the configured tag is updated.
- Summary Changes field: Type an integer tag. This tag will receive a running count of the number of changes in the Alarm/Event Control. For example, when a new Alarm occurs or when an Alarm is acknowledged, the value of the configured tag will be incremented. Reordering the rows is not counted as a change.
- Click the Navigation
Triggers button to open the following dialog:
Figure 7. Navigation Triggers dialog

You can make the on-screen Alarm Control object scroll up, scroll down, page up, page down, go to home (beginning) of page, or go to end of page by configuring tags in the corresponding fields. Whenever the values of the configred tags change, the Alarm Control object will navigate that way. This is useful for adding navigation controls to the screen; for example, if you configure the same tag to the Up field in this dialog and a Pushbutton object, then the Alarm Control object will scroll up whenever the Pushbutton object is pressed.
When you are finished, click OK to close the Advanced dialog.