IWS
provides powerful tools that enable the user to create and manage
batch historical information. The user is able to create batches by
using the following formats:
- Proprietary: When using the proprietary format, each batch will be stored on a different historical file. The user can save historical data in both the normal historical file and batch files at the same time (see Trend Folder for more information about these files).
- Database: The
historical data used for the batch is saved in the same table as
the normal historical data; an additional table called BatchHistory
keeps registers with the information about the batches. The list
below describes the fields on the BatchHistory table:
Field Name Data Type Description Group_Number Integer Trend group number. This is the number of the worksheet that you are creating to specify the tags that will be stored on your batch history. Batch_Name String Name of the batch Start_Time TimeStamp Date and Time that the batch was started. End_Time TimeStamp Date and Time that the batch was finished Pri_Table String Reserved Sec_Table String Reserved Description String Batch description Deleted Boolean 0: Batch has not been deleted
1: Batch has been deleted
Tip: You can
customize the name of the table and the name of the columns created
in the database by editing the project_name.APP
file, as follows:
[Trend]
DefaultName=NewName

[TrendGroupPRI|SEC]
BatchHistory=TableName
For example:
[TREND001PRI]
BatchHistory=MyTableForPrimaryDB

[TREND001SEC]
BatchHistory=MyTableForSecondaryDB

[Trend]
Group_Number=Trend_Worksheet
Batch_Name=Load_Number
Batch History Configuration
When you add a Trend worksheet (see
Trend folder) and click the Advanced button, the following
window will display:
Figure 1. Trend
Advanced Settings
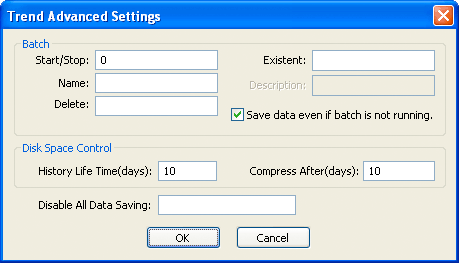
The Batch pane
provides the following fields:
- Start/Stop (input): Enter the tag that will start/stop your batches. When the tag in this field is set to TRUE (different from 0), IWS will either start saving data to your batch file (if you are using proprietary format), or add a new register to the BatchHistory table on your database, indicating that a batch has been started. Note that historical data will be saved according to the configuration in the fields Save Trigger and Save On Tag Change options on the Trend Worksheet.
- Name (input): This
field represents the batch name; its meaning depends on the format
selected on the Trend Worksheet:
- If you selected Proprietary in the Type field, the Name should comply with the format
[Path]<FileName>, where:
- Path: An optional field. If the path is not specified, the batch history file will be stored in the same path as the project_name.app file.
- FileName: Name of the batch history file.
- If you selected Databasein the Type field, the value in this field will be stored in the Batch_Name field of the BatchHistory table.
Tip: You can enter tag names between curly brackets in this field (e.g., C:\MyBatches\{MyTagWithName}{MyTagWithNumber}.hst). - If you selected Proprietary in the Type field, the Name should comply with the format
[Path]<FileName>, where:
- Delete (input): When the tag specified in this field changes its value, the batch will be deleted. With the Proprietary format, the batch history file will be removed. With the Database format, it will set the Delete field in the BatchHistory table to true, but the saved historical data will remain. The Trend object only sees batches that have the delete field set to 0 (zero).
- Existent (output): The tag entered on this field will receive the value 1 if the batch specified in the Name field already exists; otherwise the tag will receive the value 0.
- Description
(output): This field is available only when using the
Database format. When the tag in
the Start/Stop field changes to
TRUE, the register that is added to the BatchHistory table will display the
string in this field.
Tip: You can enter tag names between curly brackets in this field (e.g., {MyTag})
- Save data even if batch
is not running: If this field is unchecked, the historical
data will be saved only when the tag in the Start/Stop field is TRUE.
Tip: The Batch Historical data can be displayed to the user in either Graphical or Table format. See Trend Folder or Grid Object to display information in these formats.
- Disk Space Control
pane: The following options are available:
- History Life Time (days) field: Specify how many days to keep the history file on the disk. After the specified period, IWS automatically erases the file. Use this option only for files based on a date.
- Compress After (days) field: Specify how many days to keep the trend history file ( *.hst ) on the disk before compressing the file. After the specified period, IWS automatically compresses the file. Use this option only for files based on a date. This option is not available for Windows Embedded target systems.
- Disable All Data Saving field: Enter a tag to provide a temporary disable function. When the tag value is TRUE (different from zero [0]), the trend task stops recording data for this worksheet.