A Symbol is a set of one or more Objects that is saved to the Symbols folder (in the Graphics tab of the Project Explorer), so that you can reuse it again and again in your projects.
Every time you reuse a Symbol, you actually make a copy that is linked to the master Symbol file in the Symbols folder. (These linked copies are also called "instances" of the Symbol.) Thereafter, if you make any changes to the Master Symbol, then those changes automatically propagate to every linked copy in every project.
You can customize each linked copy of the Master Symbol by defining Custom Properties. For example, when you create a gauge that displays tank levels and then save that gauge as a Master Symbol, you can define Custom Properties on the Symbol that will allow each linked copy to display the level of a different tank.
Creating a Master Symbol
To create a master Symbol and save it to the Symbols folder:
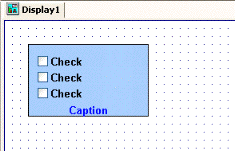
- Design your Symbol just as you would normally draw a
project screen, using any combination of
Static and
Active Objects. For example, three
check boxes in a rectangular
pane:
Figure 2. Drawing Objects in a Screen
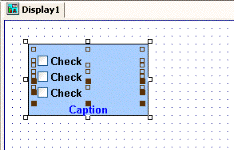
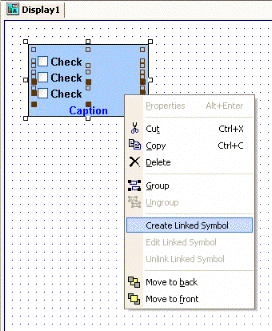
- Select the Object(s) or Group that
you want to save as a Symbol.
Figure 3. Selecting the Objects
Note: It is not necessary to make a Group out of two or more Objects before saving them as a Symbol. Saving the Objects together as a Symbol effectively groups them.There is a situation, however, where you may want to group the Objects first. A Symbol can have only one Hint. If more than one Object has a Hint configured on it (in the Object Properties), those Hints are not shown when the Objects are saved together as a Symbol. To specify a Hint for the Symbol as a whole, you must first group the Objects and then configure the Hint on the Group. That Hint will carry through when you save the Group as a Symbol.
- Right-click on the selection, and then click
Create Linked Symbol on the
shortcut menu.
Figure 4. Creating a Linked Symbol
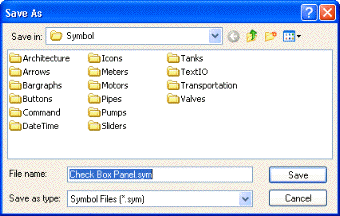
- A standard Save
As dialog is displayed, and you are prompted to give the new
Symbol a file name. Symbol files ( .sym ) are saved in the \Symbol folder of your project.
Figure 5. Saving the Symbol File
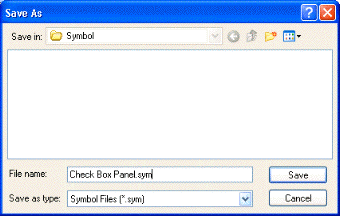
- Click Save to save
the file. The Symbol appears in the Symbols folder, in the
Graphics tab of the
Project Explorer.
Figure 6. Symbol File in the Project Explorer
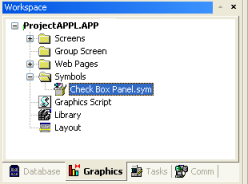
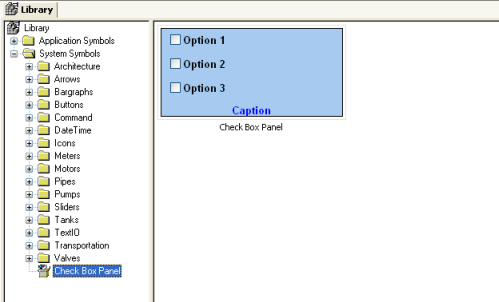
The Symbol also appears in the Project Symbols folder of the Library.
The Symbol is now ready to be reused in your project, but the way it is currently saved, every copy will have identical properties. You must now define Custom Properties on the Symbol — that is, the properties you want to be able to customize each time you reuse the Symbol.
Editing the Master Symbol
You can edit a master Symbol after you've initially saved it, to add or delete Objects in the Symbol or to define Custom Properties on it. Remember that any changes you make to the master Symbol will automatically propagate to every linked copy in every project.
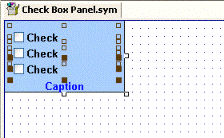
- Right-click on the Symbol file in the Symbols folder, and then choose
Edit from the shortcut menu.
Figure 7. Editing the Symbol File

Tip: You can also right-click on any instance of the Symbol and choose Edit Linked Symbol from the shortcut menu.The Symbol file is opened for editing in its own window. This Symbol Editor works in the same way as a regular Screen Editor, except that every Object in the window is part of the Symbol. If you add, move or delete Objects in the Symbol Editor, then you may change the size or shape of the Symbol and disrupt the layout of any Screens where it is used.Figure 8. Symbol File Opened for Editing
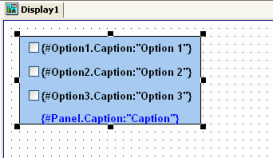
Besides adding, moving or deleting Objects in the Symbol, you can also edit the Object Properties as you normally would. You may want some properties to be the same in every instance of the Symbol, but other properties need to be customized according to where and how the Symbol is used. In this example, you probably want to customize the captions for the three check boxes, the tags with which the check boxes are associated, and the caption for the pane itself.
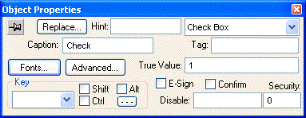
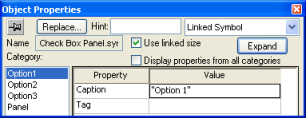
- Select the first Object in the Symbol and open its
Object Properties. For example, the first check box:
Figure 9. Object Properties for the First Check Box
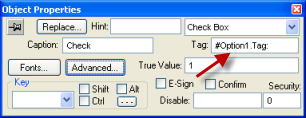
- In any field where you would normally configure a
tag, expression, or value, you can instead define a Custom Property
using the sytax…
#[Category.]Property:[Value]
…where:- Category is an optional name for a collection of related properties, such as all captions or all Check Box values. If you do not specify Category for a property, then it will be automatically listed under the "Main" category.
- Property is a label to identify the specific property. Property is required for each property, and it must always be followed by a colon (:).
- Value is an optional default value for the property.
In the following example, we want to be able to customize which tag will be set when the Check Box is selected or cleared. So, in the Tag field, type #Option1.Tag: as shown.Figure 10. Defining a Custom Property for the Tag Field
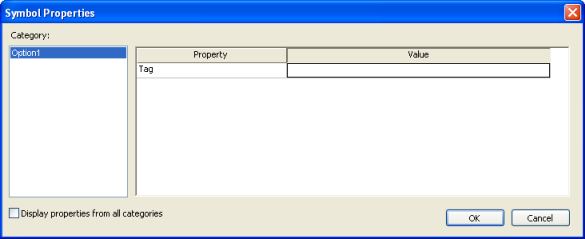
When you go to complete the properties on an instance of the Symbol, #Option1.Tag: will appear like this:Figure 11. Custom Properties on a Symbol
But more about that later…
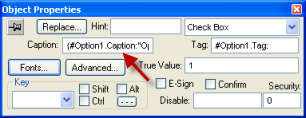
- Depending on the context, some Object properties
require a specific type of value like a String, a Boolean or a
numerical value. For these properties, you must enclose the Custom
Property declaration in curly brackets ({}).
In this example, the Caption field requires a String, so type {#Option1.Caption:"Option 1"} as shown.Figure 12. Defining a Custom Property for the Caption Field
Again, when you go to complete the properties on an instance of the Symbol, they will appear like this:Figure 13. Custom Properties on a Symbol
- Repeat steps 2 through 4 as needed, to define the
rest of the Custom Properties on the Symbol.
In this example, the finished Symbol has all of the following properties:Figure 14. Custom Properties on a Symbol
- Save the Symbol and close the Symbol Editor.
- On the Home tab of the ribbon, in the Tools group, click Verify. This will update all existing instances of the Symbol in your project.
Adding Tooltips to Custom Properties
Making a User-Made Symbol Available to Other Projects
- In the Symbols
folder of the Project
Explorer, right-click the desired Symbol file
( .sym ) and then choose
Send to System Symbols from the
shortcut menu. A standard Save
As dialog is displayed, automatically pointing to the
\Symbol sub-directory of the
IWS program
directory instead of the \Symbol
sub-folder of your project folder.
Figure 17. Saving a Symbol
- Choose a location in which to save the Symbol file. You can choose one of the existing categories/folders, or you can create a new one.
- Click Save. The
Symbol file is saved in the specified location and the Symbol is
displayed in the System Symbols folder of the
Library.
Figure 18. Saving a Symbol
For more information, see Using the Library.
Inserting a Symbol in a Screen
To insert a Symbol in a Screen and then complete its Custom Properties:
- Open the desired project screen from the Screens folder, or insert a new screen. The screen is opened for editing.
- Open the Symbols Library by doing one of the
following:
- On the Graphics tab of the ribbon, in the Libraries group, click Symbols;
- Double-click Symbols in the Project Explorer; or
- Right-click in the screen where you want to insert the symbol, and then click Insert Linked Symbol on the shortcut menu.
- Select the symbol from the Symbols Library, and then
click in the screen:
Figure 19. Symbol Placed in a Screen
Once the Symbol is inserted, you can manipulate it like any other object in the screen. You can align and distribute it with other Objects, and you can apply Animations to it. However, the first thing to do is complete the Custom Properties for this instance of the Symbol.Figure 20. Object Properties dialog for the Symbol
- Open the Object Properties for the Symbol.
- Click Expand to
open the Symbol Properties
dialog.
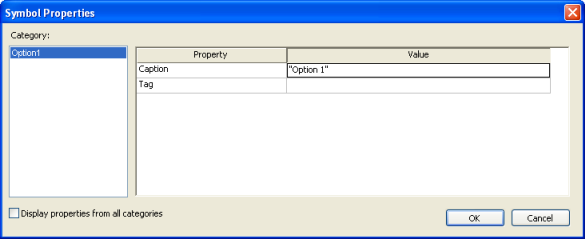
Figure 21. Symbol Properties dialog for the Symbol
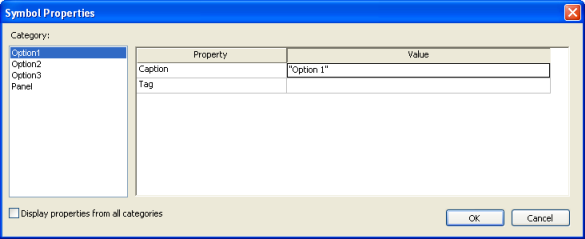
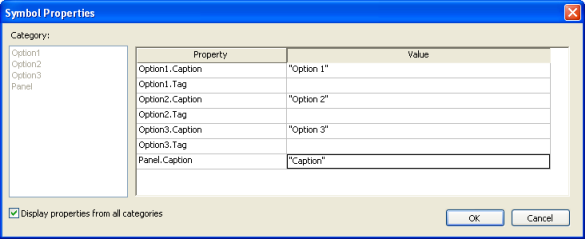
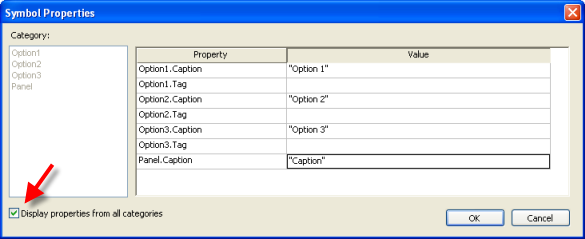
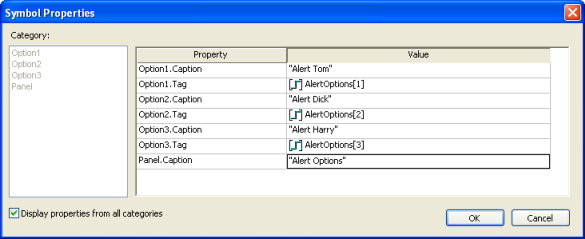
To see all of the properties at the same time, select the Display properties from all categories check box.Figure 22. Displaying Properties from All Categories
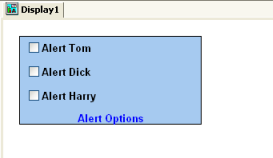
- Enter the property values as needed. In this
example, the three check boxes are used to determine whether to
alert Tom, Dick and/or Harry. The captions are updated accordingly,
and the check box tags are configured with the first three elements
of a Boolean array called AlertOptions.
Figure 23. Completed Properties for the Symbol
- Click OK to close the Symbol Properties dialog, and then close the Object Properties dialog.