|
Point View display. |
|
|
Point View configuration. |
View display
Click on the General tab of the Point Properties dialog box.
Select the View tab.
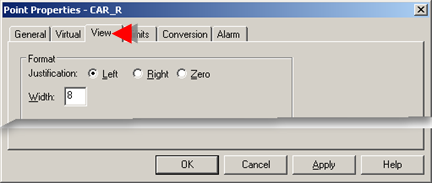
View for points configuration
The following point display properties can be specified on the View tab in the Point Properties dialog box.

|
Justification |
|
|
Width |
|
|
Precision specifications |
|
|
Display limits |
|
|
Screen |
|
Justification |
An analog point's justification when it displays in CIMPLICITY software, such as CimView.
Check the left, right or zero radio button.
|
Radio Button |
Point display justification is: |
|
Left |
Left |
|
Right |
Right |
|
Zero |
Right and zero filled |
|
Width |
Minimum number of spaces you want to use to display the point.
The width specification never causes a value to be truncated. If the number of characters in the output value is greater than the specified width, or if a width is not given, all characters of the value are printed (subject to the precision specification).
If the number of characters in the output value is less than the specified width, blanks are added to the left or right of the values, depending on whether the flag (for left alignment) is specified, until the minimum width is reached.
If the width is prefixed with 0, zeros are added until the minimum width is reached.
|
3* |
Precision specifications |
Precision specifications (displays for analog real points only) are as follows.
Enter the precision number of digits to be displayed to the right of the decimal point in field.
Select Fixed, Scientific or Compact for the format TYPE. The result of your choice is as follows:
|
Description |
||
|
Fixed |
Fixed format using the Width and Precision information you specify. |
|
|
|
Default |
6 |
|
|
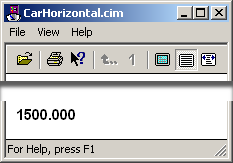
Example Width = 8 Precision =3 1500 displays as 1500.000.
Note: Select Configured for the text object in CimEdit to display the specifications on the View tab. |
|
|
Scientific |
Scientific format using the Width and Precision information you specify. |
|
|
|
Default |
6 |
|
|
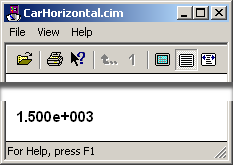
Example Width = 8 Precision = 3 1500 displays as 1.500e+003
|
|
|
Compact |
Fixed or Scientific format based on Precision information. Precision information determines the exponent to start displaying in Scientific format. |
|
|
|
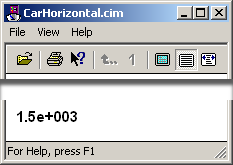
Example Width = 8 Precision = 3 1500 displays as 1.5e+003
|
|
|
|
The Compact type also truncates trailing zeros to the right of the decimal point. For example, 10.0 displays as 10 and 10.10 displays as 10.1. |
|
Guide for enabling analog display configuration: When you configure an object that uses the point in CimView, you have to enable the Justification and Width configuration in CimEdit. You do this on the Text tab of the Object Properties dialog box in CimEdit, in the Display Format field.
|
Display Limits |
Display low and Display high graphics limits are used by CimView and Trending.
CimEdit/CimView uses graphics limits as maximum/minimum limits for:
|
Horizontal/Vertical movement. |
|
|
Rotation/Fill. |
|
|
Horizontal/Vertical scaling. |
If you have a single point expression in any of the above expressions and you do not specify a minimum or maximum limit for the expression, the point's display limits are used instead. If these limits are not specified either, default values of 0 (minimum) and 100 (maximum) are used.
Trending uses the graphics limits to determine the Y-axis limits for the point.
Note: The display limits must be within the range limits you specify on the Limits properties page.
|
Display Limit |
Description |
|
Display High |
Upper bound for the display. If the point value is greater than this value, this Display High value displays. |
|
Display Low |
Lower bound for the display. If the point value is less than this value, this Display Low value displays |
![]() Important: Make sure the display limits
are within range limits
that you set.
Important: Make sure the display limits
are within range limits
that you set.
|
Display Limits Example |
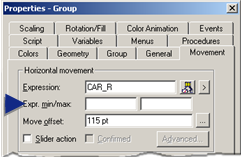
Display limits configuration (example)
Display limits are specified in the CAR_R Point Properties dialog box.
|
Display Low |
0 |
|
Display High |
5000 |
|
A car is placed on a CimEdit Screen. |
|
Horizontal movement is configured in the CimEdit Properties - Group dialog box Movement tab.
|
Expression |
CAR_R |
|
Expr. min/max |
Blank (Point Properties specifications are used.) |
|
Move offset |
115 |
|
|
|
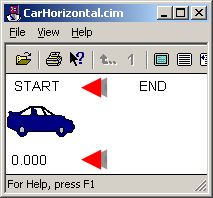
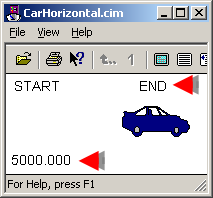
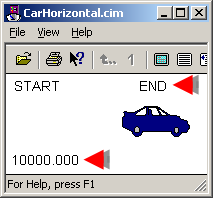
Display limits runtime (example)
|
The point value is 0. The car is at the minimum display position. |
|
|
The point value is 5000. The car is at the maximum display position. |
|
|
The point value is 10000. The car position is the same as the maximum display value, 5000. |
|
|
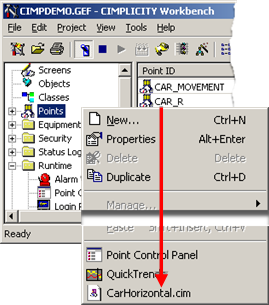
Screen |
Options include CimView screens that are in the project directory.
![]() The name of the screen you select
will appear on the point's Popup menu in the Workbench. The screen
will appear when it is selected.
The name of the screen you select
will appear on the point's Popup menu in the Workbench. The screen
will appear when it is selected.
![]() The screen will display when a
user selects this point in the Alarm Viewer and clicks Screen.
The screen will display when a
user selects this point in the Alarm Viewer and clicks Screen.
|
|
Device and virtual point configuration. |