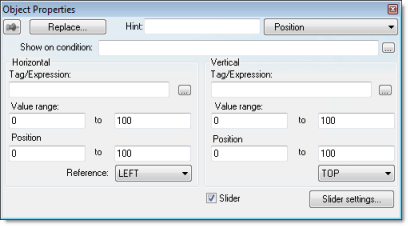
The Position animation allows you to move an object horizontally and/or vertically during runtime.
On the Graphics tab, in the Animations group, click Position to add the animation to an object. Double-click on the object to open its Object Properties dialog.

- Show on condition text box: Configure a tag/expression in this field to control when the object is shown. When the tag/expression is TRUE (i.e., any non-zero value), the object is shown. When the value is FALSE (i.e., 0 or a blank space), the object is not shown. You can also leave the field blank to always show the object.
- Slider check box:
Click (check) this option to operate the object like a slider,
which means that you can drag the object around the screen to send
values to the configured tags. (See Move below.)
Click the Slider button to configure additional settings:
- Disable text box: Configure a tag/expression in this field to control when sliding is disabled. When the value of the tag/expression is TRUE (i.e., any non-zero value), sliding is disabled. When the value is FALSE (i.e., 0 or a blank space), sliding is enabled.
- Security text box: Enter the security level required to use the object as a slider.
- Move area:
Configure these settings to determine how the object moves on the
screen:
- Tag / Expression text boxes: The meaning of these
boxes depends on whether the Slider option is enabled (see above):
- Expression text box: If the Slider option is not enabled, then configure either a tag or an expression in this field. The current value of the tag / expression determines the current position of the object. As the value changes, the object is moved on the screen.
- Tag text box: If the Slider option is enabled, then enter only an Integer or Real tag in this field. The tag will receive a value that is equivalent to the current position of the object. As the user moves the object, the value is changed.
For the Horz (horizontal) position, the value increases as the object moves to the right and it decreases at the object moves to the left. For the Vert (vertical) position, the value increases as the object moves to the bottom and it decreases at the object moves to the top.
- Range text boxes: Enter the minimum and maximum values for the tag / expression. If the actual value goes outside of its range, then the value is ignored and the limit is used instead.
- Position text
boxes: Enter values to specify how far (in pixels) the object can
move from its starting position. The starting position is equal to
"0,0". Values greater than 0 allow the object to move right and
down, and values less than 0 allow the object to move left and up.
During runtime, the object's position is proportional to the tag / expression value within its range. For example, if Position is 0 to 100 and Range is 0 to 10, then each increment in the value will move the object 10 pixels. This is true for both Horz and Vert.
- Reference
drop-down lists: Select a reference point on the object. The
following table shows how your selections for Horz and Vert work in
combination:
LEFT CENTER RIGHT TOP 


CENTER 


BOTTOM 


This reference point is meaningful only if you have the Size animation added to the same object. The position of the object is always based on this reference point, regardless of the size or shape of the object.
- Tag / Expression text boxes: The meaning of these
boxes depends on whether the Slider option is enabled (see above):