The radio button object is useful to create interfaces where the users can chose one option from multiple options on the display.
- Click in the drawing area and drag the mouse/cursor to draw the radio button and its label.
- Release the mouse button when the object is the size you want.
- Double-click on the object to view the Object Properties dialog.
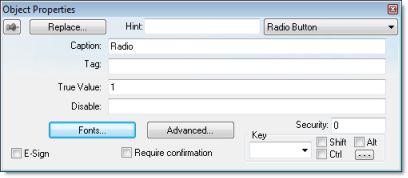
Figure 1. Object Properties: Radio Button
[Objects]
RadioButtonSize=height_in_pixels
Doing this will change the size of all radio buttons in your project, so be careful. Also, this only works for projects running in the project viewer (Viewer.exe); it does not work for projects running in CEView or the Web thin client.
- Caption: Specify a caption by typing the text into the text box. You can include a tag by enclosing it in curly brackets (e.g., {tagname}).
- Fonts: Specify a font style for the caption by clicking the Fonts button.
- E-Sign: When this option is checked, the user will be prompted to enter the Electronic Signature before executing the command.
- Confirm checkbox: Click (check) this box to ensure IWS prompts you to confirm the action at runtime.
- Key drop-down
list: Select a key from the list to associate that keyboard key
with the object or group of objects. You can then press this key to
check/uncheck the radio button.
Click (check) the Shift, Ctrl, and/or Alt boxes to create a combination key, meaning the Shift, Ctrl, and/or Alt key must be pressed with the key specified in the drop-down list.
Click the browse button … to open the Key Modifier dialog, which enables you to further modify your combination keys. You can choose Left, Right or Left or Right to specify the position on the keyboard of the Shift, Ctrl, or Alt key in the combination key. If you choose Left or Right, the command will be executed any time either of these keys is pressed in combination with the key specified in the drop-down list.
- Disable field: Type a tag or expression into this field to enable and disable the object. You disable the radio button object when you enter a value different from 0.
- Security field: Type a value in this field to specify a security level for the object, as defined under Security. When a user logs on, and does not have the specified security level, IWS disables the object.
- Tag field: When the user clicks on the radio button during runtime, the value of this tag is updated. If no Feedback was specified, the value of this tag is also used to indicate the current status of the object.
- True Value: Specify a value that will be used to change the control to TRUE state and to indicate that the control is in TRUE state. For more information about states, please refer to the states table.
- Advanced: Press
this button to open the Advanced dialog:
Figure 2. Advanced dialog

- Tri-State: If
enabled the control has a third state. The third state will be
displayed when the tag configured in the Feedback field assumes the value specified in
the Tri-State field. If the
Feedback field is left in blank,
the third state will be displayed when the tag configured in the
Tag field assumes the value
specified in the Tri-State field.
CAUTION:The Tri-State field must not be configured with the same value as the True Value field, nor with an empty string value.
- Feedback: Value that indicates the state of the object (FALSE, TRUE, or TRI-STATE). When the value of the tag configured in Feedback is equal to the value of the tag configured in True Value, the state is set to TRUE. When the value of the tag configured in Feedback is equal to the value of the tag configured in Tri-State, the state is set to TRI-STATE. When none of these conditions are satisfied, the state is set to FALSE. If the Feedback field is left in blank, then the tag configured in the Tag field will be used as the Feedback tag.
- Ext Trans.: When this option is checked, the caption of the object supports the translation.
- Auto gray out: Turns the caption of the object to gray when it is disabled by the Disable field or due to the Security System.
- Force: Click (check) this box to force the Tag Database to recognize a tag change when the user clicks on the object, even if the value of the tag in question does not change.
- Enable Focus: When this option is checked, the object can receive the focus during runtime by the navigation keys.
- Push Like: When this option is checked the control is displayed as a button, instead of the standard radio button standard shape.
- Fill Color: Specify the fill color for the button. This option is enabled only when the Push Like option is checked.
- Auto Format: When checked, if the caption includes a decimal value enclosed by curly brackets (e,g, {1.2345}) or a tag of Real type (see Caption above), then the value will be formatted according to the virtual table created by the SetDecimalPoints() function.
- Tri-State: If
enabled the control has a third state. The third state will be
displayed when the tag configured in the Feedback field assumes the value specified in
the Tri-State field. If the
Feedback field is left in blank,
the third state will be displayed when the tag configured in the
Tag field assumes the value
specified in the Tri-State field.
Modes of Operation
The Radio Button object can operate in two different modes: Normal and Tri-State. For more information, see Modes of operation for Check Box and Radio Button objects.