- Message Display: Enables you to display any one of multiple messages within a single screen object.
- Multistate Indicator: Enables you to display any one of multiple messages within a single screen object, and also has the ability to display bitmap images with the messages.
- Multistate Pushbutton: Enables you to display messages and bitmap images. This object also resembles a multi-position switch in that it allows you to switch (toggle between) messages by clicking on the object during runtime.
These smart message object types vary in their ability to display messages and graphics, write to a tag, and control how many messages and graphics display on the screen. However, all of the object types can receive process input (Read Tag value) to determine which message to display.
- Click the Smart Message button and position the mouse on the screen.
- Click and drag to create (and adjust the size of) a
rectangle.
You use the rectangle's size and font size to determine how much text and how large a bitmap image you can display on the screen. Later, you can change the rectangle's size and font characteristics to allow longer messages to display in a given space.
- Double-click on the object to open the Object Properties dialog.

- Type combo-box:
Click to select the smart message object type. The object type sets
the behavior of the object during runtime and the features
supported by it:
- Message Display (default)
- Multistate Indicator
- Multistate Pushbutton
- Value drop-down
list: Select the type of values used to index the message list:
- Boolean: Provides two valid states. Use this selection when you want to display either one of two different messages, based on a boolean value (0 or 1).
- Integer (default): Provides 500 valid states. Use this selection when you want to display different messages based on specific values from an Integer tag.
- LSB (least significant bit): Provides 32 valid states (32 bits in an integer value). Use this selection when you want to display different messages based on which bit from an integer tag is set. If more than one bit from the Integer tag is set simultaneously, the message associated with the least significant bit that is set (value 1) will be displayed.
Note: If Multistate Pushbutton is the Smart Message type, only 16 different messages can be associated with the object, even for Integer or LSB values. - Read Tag/Expr text box: Enter the name of an integer or a Boolean tag. The value of this tag will determine which message will displayed by the object during runtime.
- Write Tag text box (optional and available for Multistate Pushbutton only): Enter the name of an integer or a Boolean tag. The value associated with the message currently displayed by the object is written to this tag.
- Align: Select the alignment of the text displayed by the Smart Message object.
- Key area (optional and available for Multistate Pushbutton only): Shortcut used to go to the next message (step) using a keyboard when the Multistate Pushbutton type is selected. This option is especially useful when creating projects for runtime devices that do not provide a mouse or touch-screen interface, when the keyboard is the only physical interface available to interact with your project during runtime.
- Event drop-down
list (available for Multistate
Pushbutton only): Select one of the following options to
specify when the message is changed:
- On Down: Switch to the next message when you click on the object (default).
- While Down: Switch to the next message continuously while you hold the mouse button down on the object.
- On Up: Switch to the next message when you release the mouse button on the object.
- E-Sign (available for Multistate Pushbutton only): When this option is checked, the user will be prompted to enter the Electronic Signature before executing the animation.
- Security (available for Multistate Pushbutton only): System Access Level required for the object/animation.
- No line: When this option is checked, the line border of the object is not visible.
- Line Weight: Defines the thickness of the line drawn around the object (the border).
- Fonts: Launches the Fonts dialog, where you can configure the font settings for the text displayed in the object.
- Config…: Launches
the Configuration dialog,
where you can configure the messages for the object, as follows:
Figure 2. Smart Message Configuration Dialog
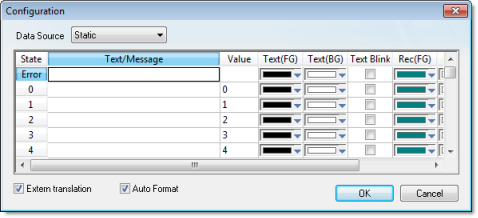
- Data Source: The messages displayed by the object can be either configured directly on the object (Data Source = Static) or can be read from an external text file (Data Source = Text File). When the Data Source = Static, the Configuration dialog is displayed as pictured above, and you can configure all the settings on the grid. When the Data Source = Text File, the Configuration dialog displays a field for entering the path and name of the file from which the messages will be read (the source file). See "Source File Format" below for more information about the format of the text file supported by the Smart Message object when the Data Source = Text File.
- Enable translation: Click (check) to enable translation during runtime using the Translation Tool.
- Auto Format: When checked, if a message includes a decimal value enclosed by curly brackets (e,g, {1.2345}) or a tag of Real type (see Text/Message below), then the value will be formatted according to the virtual table created by the SetDecimalPoints function.
| Property | Description |
|---|---|
| Text/Message | Message (text) that will be displayed when selected during runtime. You can include tags in a message by enclosing them in curly brackets (e.g., {tagname}). |
| Value | You must associate a unique value with each message. during runtime, the object will display the message associated with the value that matches the value of the tag configured in the Read Tag field. If there is no such message, the message configured in the first row (State = Error) displays during runtime. When the object Type is set as Multistate Pushbutton, the value associated with the current message is also written to the tag configured in the Write Tag field (if any). |
| Text (FG) | Foreground color for the messages displayed during runtime. |
| Text (BG) | Background color for the messages displayed during runtime. |
| Text Blink | If checked, the message text will blink during runtime. |
| Rec (FG) | Line color (Border) for the rectangle behind the message. |
| Rec (BG) | Background (Fill) color for the rectangle behind the message. |
| Rec Blink | If checked, the rectangle behind the message will blink during runtime. |
| Graphic File | Path and name of the bitmap file (*.BMP) (if any) that will be displayed when the message associated with it is selected during runtime. If you do not specify the path, the bitmap file must be stored in your project folder. |
| Transparent | Select the color that will be transparent in the graphic file, if the En. Transparent checkbox is checked. |
| En. Transparent | If checked, the color selected in the Transparent field will be set as transparent in the graphic file. |
Source File Format
This section describes the format of the text file supported by the Smart Message object when the Data Source = Text File. The main advantage of using an external text file instead of static values is that it gives you the flexibility to change the messages during runtime, by pointing to a different text file, or even by changing the content of the text file dynamically.
The text file must be created in the CSV format (comma separated values), where the comma character ( , ) is used to divide the columns (data) in each line (row) of the file. Therefore, you can use any CSV editor such as Microsoft Notepad and Microsoft Excel to create the CSV file with the messages and their properties for the Smart Message object.
| Column # | Property | Default Value |
|---|---|---|
| 1 | Text/Message | - |
| 2 | Value | - |
| 3 | Text (FG) | 0 |
| 4 | Text (BG) | 16777215 |
| 5 | Text Blink | 0 |
| 6 | Rec (FG) | 8421376 |
| 7 | Rec (BG) | 16777215 |
| 8 | Rec Blink | 0 |
| 9 | Graphic File | - |
| 10 | Transparent | 0 |
| 11 | En. Transparent | 0 |
- The first line of this file is equivalent to the State = Error. In other words, if there is no message associated with the current value of the tag configured in the Read Tag field, the message configured in the first row (State = Error) is displayed during runtime.
- The data configured in the Value column of the first row from this file is irrelevant. This row must always be configured, regardless of the object type (even for Multistate Pushbutton).
- Only the Text/Message and Value columns are mandatory. The other columns are optional, and the default values will be used if you do not specify any value for them (see table).
- The fields Text(FG), Text(BG), Rec(FG), Rec(BG) and Transparent can be configured with the code of the color associated with it. The code can be entered directly in decimal format (e.g., 255) or in hexadecimal format using the syntax #value (e.g., #0000FF).
- The fields Text Blink, Rec Blink and En. Transparent can be configured with Boolean values 0 or 1 (0 = Unchecked; 1 = Checked), or with the keywords FALSE or TRUE (FALSE = Unchecked; TRUE = Checked).
Error Message,,0,16777215,1,8421376,16777215,1,error.bmp,0,0
Message Zero,0,0,16777215,0,8421376,16777215,0,open.bmp,65280,1
Message Ten,10,0,16777215,0,8421376,16777215,0,closed.bmp,65280,1
Message Twenty,20,0,16777215,0,8421376,16777215,0,,0,0
Message Thirty,30,0,16777215,0,8421376,16777215,0,,0,0