On the Graphics tab, in the Active Objects group, click List Box to create a List Box object on your screen. Generally, when you run a project, the active List Box object displays a list of messages.
On a screen containing only one List Box object and no text input boxes, the List Box object will be active automatically.
On a screen containing multiple List Box objects and text input boxes, you can use a cursor (pointing device) or the Tab key to select and activate a List Box object.
You can select a message from the active list box during runtime and write the message value to a tag. (If a list is too long to fit within the viewable area of a List Box object, the object provides scroll bars.)
- Check (enable) the Enter Reqd box and use the keyboard/keypad keys, list control objects from the Library, pointing devices, or user-defined keys containing the PostKeys() function to scroll through the message list. Then, use the Enter key to select the message and write its value to the write tag. You can use the Esc and Tab keys to return to the previously selected message at any time prior to pressing the Enter key.
- Uncheck (disable) the Enter Reqd field to write the value of a selected (highlighted) message the write tag automatically.
- On the Graphics tab of the ribbon, in the Active Objects group, click List Box.
- Click in the screen and drag to create/adjust an
expanding rectangle.
Height and the font size determine how many messages are visible.
Width determines how much of the message length is visible.
After creating a rectangle, you can adjust the size and font characteristics to allow more messages to display in the given space.
- Double-click on the object to open the Object Properties dialog.

- Value drop-down
list (located below the Replace
button): Click to select one of the following the tag values used
to index the message list.
- Boolean
- Integer (default)
- LSB (Least
Significant Bit)
Note: For more information, see the discussion about the State field on the Messages Configuration dialog.
- Messages button: Click to open the Messages Configuration dialog.
- User Enable text box: Type a tag, expression, or a (nonzero) number to select a message in the runtime project. The default is1 (true or enabled).
- Control Enable
text box: Type a tag, expression, or a (nonzero) number to select a message in the runtime
project — depending on the current value of the Read/Search Tag. The default is1 (true or
enabled).
IWS bases this parameter on the Value field (in the Messages Configuration dialog) that you associate with the selected message. Enabling this field allows tag changes triggered by the process to affect which messages you can select.
- Read/Search Tag text box: Type an integer or a Boolean tag to point to a selected message based on the message Value field (in the Messages Configuration dialog). You can use the Control Enable and User Enable fields to control whether the operator or a process can alter this tag.
- Write Tag text box (optional): Type a string tag to receive the Message value of the last-selected message. When you close and reopen the screen containing a List Box object, IWS uses this tag value to determine the last message selected in the list box.
- E-Sign checkbox: When this option is checked, the user will be prompted to enter the Electronic Signature before executing the animation.
- Row checkbox: Click (check) to include set up and set down arrows in the List Box object scroll bar.
- Page checkbox: Click (check) to include page up and page down arrows in the List Box object scroll bar.
- Start/End checkbox: Click (check) to include home and end arrows in the List Box object scroll bar.
- List wrap checkbox: Click (check) to continue displaying and scrolling the message list (starting at the opposite end) after you scroll to the beginning or end of the list.
- Enter Reqd checkbox: Clicking (checking) this box allows you to select messages using the Enter key only. It prevents the Tab key from selecting messages.
- Color boxes: Click
a color box to open the Color
dialog or the 16-color Color
Selection dialog. Either dialog allows you to specify or
change colors for the List Box object. Click a color to select it
and then click OK to close the
dialog.
- Highlight Color box: Specify a color for highlighting messages (default is blue).
- Text Color box: Specify a color for highlighting message text (default is black).
- Win Color box: Specify a color for the list box background (default is white).
- Border Color box: Specify a color for the list box border (default is black).
Messages Configuration Dialog
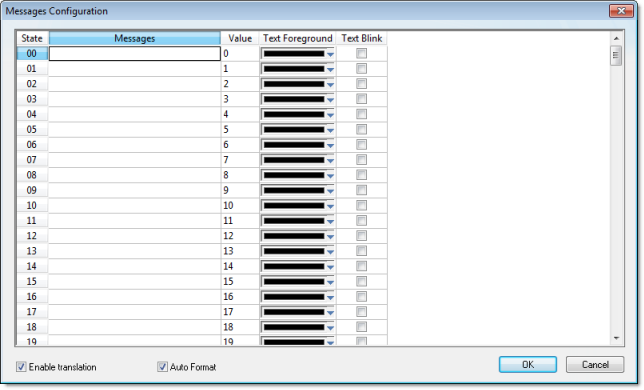
- State field
(read-only): Use this field to view the
indexed individual messages. IWS numbers this field based on the Read/Search Tag type you selected:
- Boolean: Provides two valid states, labeled 0 and 1
- Integer: Provides 255 valid states, labeled 1 to 255
- LSB: Provides 32 valid states (32 bits in an integer value) labeled 0 to 31
- Message field: Enter the string to be displayed in the List Box object. You can include tags in a message by enclosing them in curly brackets (e.g., {tagname}).
- Value field: Type
a message value matching the specified Read/Search Tagvalue. (Also, the same value
written to the write tag.)
If you specify LSB for the Value field, IWS uses the value specified in the State field for both the Read/Search Tagand the write tag.
- Text Foreground color field: Click to specify a color for the message text foreground. When the Color dialog displays, click on a color to select it, and close the dialog.
- Text Blink checkbox: Click (check) to cause a selected message to blink, once per second, when it displays.
- Fonts button: Click to open the Font dialog, which allows you to change the characteristics (style, size, and so forth) of the message font.
- Enable translation: Click (check) to enable translation during runtime using the Translation Tool.
- Auto Format: When checked, if a message includes a decimal value enclosed by curly brackets (e,g, {1.2345}) or a tag of Real type (see Message above), then the value will be formatted according to the virtual table created by the SetDecimalPoints() function.