In addition to ODBC, IWS also supports Microsoft .NET ActiveX Data Objects (ADO.NET) for interfacing between the project tags database and other external databases. A Database/ERP worksheet is used to associate project tags with external database fields.
To interface with an external database, you must first configure a connection to the database and then build a worksheet that associates project tags with the database fields.
Database Connections
- In the Project Explorer, open the Database/ERP folder and then right-click on Connections.
- Choose Insert from
the shortcut menu.
The Database Connection dialog is displayed.Figure 1. Database Connection dialog
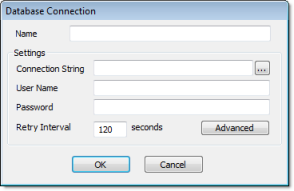
- In the Name field, enter the name that you want to use to reference the target database. You can create multiple database connections, but each connection must have a unique name.
- In the Connection
String field, click the browse button … to open a standard Data Link Properties dialog. Use the
dialog to configure a connection string for the target database.
Note: The list of Database Providers shown in the Data Link Properties dialog depends on the providers actually installed and available in the station where you are running the development application. For more information about using the Data Link Properties dialog, please refer to Windows Help.
- In the User Name and Password fields, enter an appropriate login for the target database. The login should already be created on the database server, and it should have enough privileges to read from and write to the database tables.
- If you are connecting to a remote database through
the
Studio Database Gateway, then click the Advanced button to open the advanced settings
dialog, as shown below.
Figure 2. Database Connection (Advanced) dialog
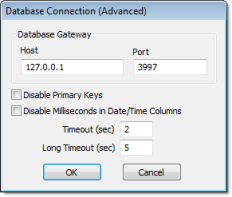
- In the Host field,
enter the IP address of the station that is running the
IWS Database
Gateway software (STADOSvr.exe). In
the Port field, enter the port
number on which the software has been configured to run.
Other settings to configure, if necessary:
- Disable Primary Keys checkbox: IWS will try to define a primary key to the table in order to speed up the queries. If you are using a database that does not support primary keys (e.g., Microsoft Excel), then you should check this box.
- Disable Milliseconds in Date/Time Columns checkbox: IWS will try to include milliseconds when saving a date/time in the database. If you are using a database that does not support milliseconds, then you should check this box.
- Click OK to close the dialog and save the connection configuration.
\project_name\Config\DB1.XDC
Database Worksheet
- On the Insert tab of the ribbon, in the Task Worksheets group, click Database; or
- Right-click on the Database/ERP folder in the Project Explorer, and then click Insert on the shortcut menu; or
\project_name\Config\DB001.XDB
Database worksheets are executed under the Database Client Runtime task. However, creating a new worksheet does not automatically enable the task; you must use the Execution Tasks dialog (Tasks on the Home tab of the ribbon) to configure the task to start at runtime. For more information, please see Execution Tasks.
Also, database worksheets run only on the server, and all triggers must be configured with server tags.
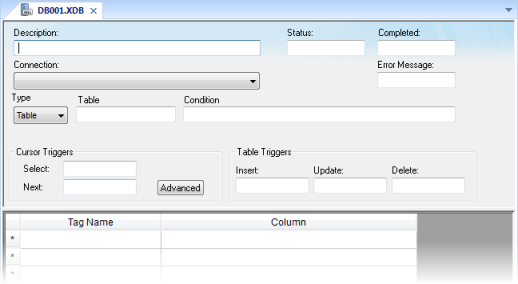
Worksheet Header
- Description field: Enter a description of the worksheet, for documentation purposes.
- Status field:
Enter the name of a numeric tag that will receive status codes for
database operations during runtime:
Table 1. Status codes for external database operations Status Code Description 4 Result set is empty 3 Cursor released and query successfully closed 2 Beginning of result set reached, usually while moving cursor to previous row 1 End of result set reached, usually while moving cursor to next row 0 No errors; status normal -1 Error while connecting to specified database (see Connection below) -2 Error while selecting result set -3 Error while moving cursor to next row (see Next trigger below) -4 Error while moving cursor to previous row (see Previous trigger below) -5 Error while closing the query (see Close Query trigger below) -6 Error while inserting rows in result set (see Insert trigger below) -7 Error while updating result set (see Update trigger below) -8 Error while deleting result set (see Delete trigger below) - Completed field: Enter the name of a numeric tag that will be toggled when database commands are successfully executed.
- Error Message field: Enter the name of a string tag that will receive detailed error messages, if errors occur during runtime.
- Connection combo-box: Click to select a connection to the target database. All available connections are listed, as configured with the Database Connection dialog described above.
- Type combo-box:
Click to specify how the result set will be selected for the
worksheet:
- Table: Enter a table name and an optional filter condition. (The filter condition is equivalent to the SQL "Where" clause.) All rows of the table that match the filter condition are selected.
- SQL: Enter a custom SQL "Select" statement.
Note: For Table, Condition and SQL Statement, you can enter the names of project tags that contain the desired information. This lets you programmatically change the selection during runtime. However, tag names must be enclosed in curly brackets ({}) to distinguish them from literal strings. Also, you must release an existing selection before you open a new one; see Close Query below. - Cursor
Triggers area…
- Select field: Enter any tag; when the value of the tag changes, a new cursor opens the first row of the result set and copies those values to the tags configured in the worksheet body.
- Next field: Enter any tag; when the value of the tag changes, the cursor moves to the next row of the result set and copies those values to the tags configured in the worksheet body.
- Advanced button:
Click to open the Advanced Cursor
Options dialog…
Figure 4. Advanced Cursor Options dialog
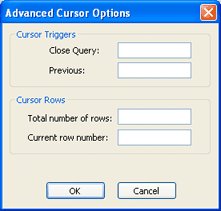
- Close Query field: Enter any tag; when the value of the tag changes, the cursor releases the result set.
- Previous field: Enter any tag; when the value of the tag changes, the cursor moves to the previous row of the result set and copies those values to the tag configured in the worksheet body.
- Total number of rows field: Enter a numeric tag that will receive the total number of rows in the result set.
- Current row number field: Enter a numeric tag that will receive the number of the current row (i.e., the position of the cursor). When a result set is first opened using the Select trigger, this number is 1. Each Next trigger increments this number, and each Previous trigger decrements it.
- Table Triggers
area…
- Insert field: Enter any tag; when the value of the tag changes, a new row is inserted with the current values of the tags configured in the worksheet body.
- Update field: Enter any tag; when the value of the tag changes, all rows of the result set are overwritten with the current values of the tags configured in the worksheet body.
- Delete field: Enter any tag; when the value of the tag changes, all rows of the result set are deleted.
Note: Table triggers are available only when Type is set to Table, because these operations work on the entire table row.
Worksheet Body
In the body of the worksheet, you can map project tags to the columns (fields) of the result set. For each row of the body, enter a Tag Name and its corresponding Column. Which columns are available depends on how the result set is selected, and how it is selected may change during runtime, so be sure to map all necessary columns.