The Import Wizard is a powerful tool that reduces engineering time during project development. Using the Import Wizard, you can import tags from different data sources directly to the project tags database. Depending on the data source, you can import not only the tag names, but also the communication interface (the link between the tags and the PLC addresses).
When you click Import
Wizard on the Home tab of the ribbon, an Import Database Wizard dialog displays to
step you through the process of importing tags. There are three
steps for importing tags from these data source types:
- InduSoft Web Studio Project Database
- OPC Server Database
- CSV Database
- ODBC Database
- RSLogix™ 5000 CSV Database
- PanelBuilder32™ Database
- OMRON™ CX Programmer Database
- TwinCAT™ PLC Database
- PanelMate Plus™ Database
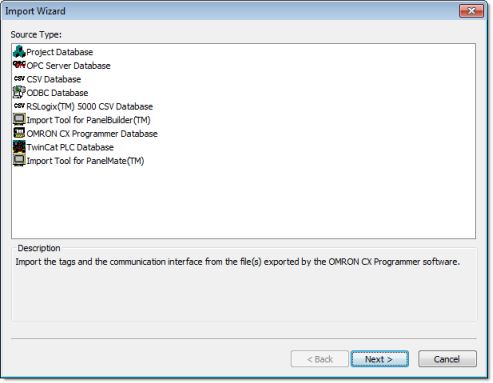
Step1: Select the Source Type
Figure 1. Import
Wizard


Click the data Source Type, which is where the tags are being imported from. Click Next.
Continue to the appropriate section for the
instructions you need to complete the import database procedure:
- Importing from Other project databases
- Importing from OPC Server Databases
- Importing from CSV Databases
- Importing from ODBC Databases
- Importing from PanelBuilder32 Databases
- Importing from RSLogix 5000 CSV Databases
- Importing from OMRON CX Programmer Databases
- Importing from TwinCAT PLC Databases
- Importing from PanelMate Plus Databases
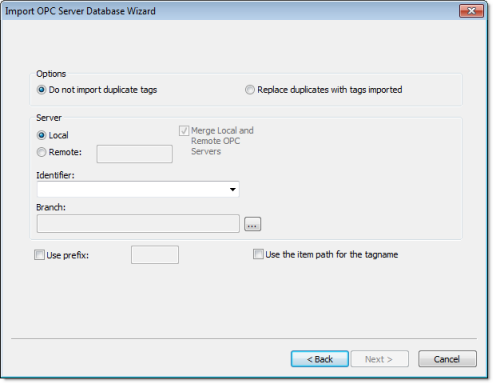
Step 2: Configure the Source Type Settings
Figure 2. Import OPC
Server dialog


Most of the settings in the second window depend on
the data Source Type selected in the first step. The screenshot
above is an example of one data Source Type (OPC Server Database).
The settings that are common for any data Source Type are described
below:
- Options box: Select Do not import duplicated tags if you do not want imported tags to overwrite tags with the same name that already exist in the Tags Database of the current project. Select Replace duplicates with tags imported to overwrite tags in the Tags Database with imported tags of the same name.
- Use Prefix: Check to specify a prefix (up to 4 characters) to be concatenated to the name of the imported tags. It is useful to use a prefix to differentiate the imported tags from the tags created manually.
Note: The
other settings vary according to the data source selected in the
first step, and they are described in the specific sections for
each data Source
Type.
After configuring the settings in this dialog, click Next.
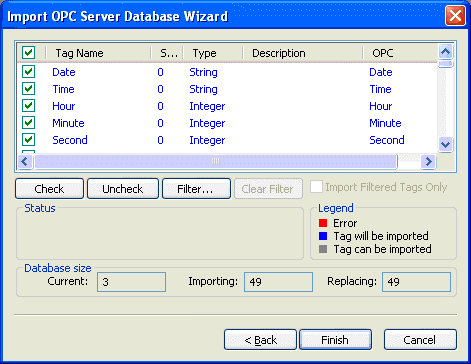
Step 3: Filter the tags
Figure 3. Import OPC
Server dialog


The screenshot above is an example of one data
Source Type (OPC Server Database). The fields and settings that are
common for all data Source Types include the following:
- Grid: Displays the
list of tags found on the data source.
- checkbox: Check to import the tag from the data source to the Tags Database of the current project.
- TagName: Name of the tag
- Size: Array size of the tag
- Type: Data type of the tag (Boolean, Integer, Real, String or Class:<ClassName>)
- Description: Description of the tag
- Check button: Click to select/import all tags in the grid
- Uncheck button: Click to uncheck all tags in the grid
- Filter button: Click to filter the tags. The Filter dialog will display, allowing you to specify a mask for each column in the grid. Wild cards (* and ?) can be used to filter data.
- Clear Filter button: Click to reset the filter.
- Import Filtered Tags Only checkbox: Check this option to import only the tags that are visible in the grid (filtered).
- Status box: Displays a message describing the status of the tag currently selected in the grid. This information is especially useful to indicate why a tag cannot be imported.
- Legend box: Describes the meaning of the colors
that represent tag status:
- (Red) Error:Tag cannot be imported because it is not supported by IWS. See the Status box for a detailed description of the error.
- (Blue) Tag will be imported:Tag will be imported after you click the Finish button.
- (Gray) Tag can be imported:Tag can be imported but it has not been checked.
- Database size box:
Displays summary information regarding the current Import Wizard:
- Current: Indicates the number of tags configured in the Project Tags database of the current project
- Importing: Indicates the number of tags selected to be imported
- Replacing: Indicates the number of tags configured in the Project Tags database of the current project that will be replaced by an imported tag with the same name.
After selecting the tags to import, click the Finish button, or click Cancel to abort the operation.
Note: The
other settings vary according to the data source selected in the
first step, and they are described in the specific sections for
each data Source Type (see below).
Data Source Types
Continue to the appropriate section for the
instructions you need to complete the import database procedure:
- Importing from Other project databases
- Importing from OPC Server Databases
- Importing from CSV Databases
- Importing from ODBC Databases
- Importing from PanelBuilder Database Wizard
- Importing from RSLogix 5000 CSV Database Wizard
- Importing from OMRON CX Programmer Databases
- Importing from TwinCAT PLC Databases
- Importing from PanelMate Wizard