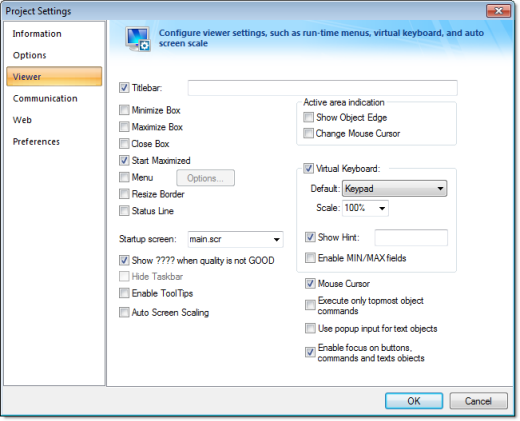
Use this tab to configure the project viewer and change certain runtime behaviors.
Figure 1. Project
Settings: Runtime Desktop tab


- Titlebar checkbox and text field: Click (enable) this box and type a new name into the field provided to specify or change the default titlebar text for the Viewer window.
- Minimize Box, Maximize Box, and Close Boxcheckboxes: Click these boxes to display (enable) or hide (disable) these buttons on the Viewer window.
- Start Maximized checkbox: Click (enable) this box to maximize the Viewer window automatically when you run your project.
- Menu checkbox and
Options… button: Click (enable)
the checkbox and the Options…
button to specify which menu options are available at runtime. When
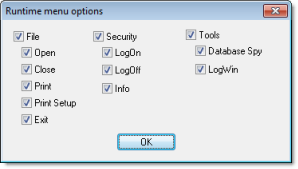
the Runtime menu options
dialog displays (as follows), click the checkboxes to display
(enable) or hide (disable) these menu options.
Figure 2. Runtime Menu Options dialog

- Resize Border checkbox: Click (enable) this box to allow the user to resize the Viewer window during runtime.
- Status Line checkbox: Click (enable) this box to display the Status Line in the runtime project.
- Startup screen
field: Click the combo box and select the screen
( .SCR ) or screen group
( .SG ) you want to
display automatically when you open the runtime project.
Note: Another way to specify a screen or screen group as the startup screen is to right-click on it in the Project Explorer and then choose Set as startup from the shortcut menu.
- Show ???? when quality is not GOOD checkbox: Click (enable) this box to display question marks (???) instead of the tag's value when their quality is not good.
- Hide Taskbar checkbox: Click (enable) this box to hide the Windows taskbar by default.
- Enable ToolTips checkbox: Click (enable) this box to see Windows ToolTips when running your project. You can configure tooltips in the Hint field of the Object Properties dialog of each object.
- Auto Screen Scaling checkbox: Click (enable) this box to automatically scale project screens when you resize the Viewer window. This feature is available for local projects running on Windows PC or in the Thin Client. This parameter is not available for projects running on Windows Embedded target systems.
- Active area indication pane: Click (enable) the Show Object Edge and Change Mouse Cursor checkboxes in this area to modify the object edge and the mouse cursor when moving the cursor over any object where the Command animation has been applied.
- Virtual Keyboard:
When this option is checked, the Virtual
Keyboard is enabled for your project. (This option does
not apply when your project is running on a
Thin Client; for more information, see Project Settings: Web.) The
keyboard allows the user to enter data during runtime on
touchscreen panels — that is, without typing on a physical
keyboard. For example, a Text object with the
Text Data Link
animation applied and the Input
Enabled option checked.
You can establish a default configuration for the virtual keyboard:
- Default: Select the default keyboard type to be used in your project, when no keyboard type is specified by the calling object or function.
- Scale: Using this option, you can shrink or enlarge the keyboard to fit the size of the target display. A value of 100% represents the default size of each keyboard type.
- Show Hint checkbox and field: When this option is checked, a hint is displayed in the title bar of the keyboard. For individual objects, the hint is configured in the Object Properties dialog. Otherwise, type a string value in the Show Hint field to serve as a defaut hint.
- Enable Min/Max
Fields option: When this option is checked, the minimum and
maximum allowed values are displayed at the bottom of the keyboard.
For objects, these values are configured in the
Object Properties dialog.
Otherwise, the Min and Max
properties of the associated Tag are used by default.
Note: The Min and Max fields are displayed only on the Keypad keyboard type, and only when the associated Tag is defined as Integer or Real. If Min is greater than Max, then input will be disabled. If Min/Max configured on the object is different from Min/Max configured in the Tag properties, then your project will attempt to scale the input accordingly.
- Mouse Cursor
checkbox: Click (enable) this box to show the mouse cursor in the
runtime project.
Note: The Mouse Cursor option is not supported in Windows CE running on Armv4I processors.
- Execute only topmost
object commands checkbox: This option controls how your
project behaves when the user clicks in an area where two or more
screen objects overlap. If this option is checked, then only the
commands on the topmost object will be executed. If this option is
not checked, then the commands on all of the overlapping objects
will be executed.
Note: The topmost object is the one with the highest ID number. (The ID number of an object is displayed in the status bar at the bottom of the development environment.) You can use the Move to Back / Move to Front and Move Backward / Move Forward tools to change the order in which objects are stacked.