Select the Web tab on the Project Settings dialog:
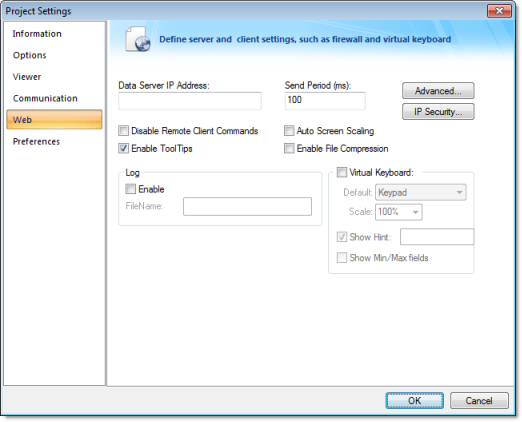
- Data Server IP
field: Type the IP address (or host name) of your data server
station. The data server station is the computer or device where
the TCP/IP server module of IWS is running. If this field is left blank,
then the Thin Client will assume that the Web server (i.e., the
address entered into the browser) is also the data server.
Tip: You can use the IP address 127.0.0.1 (localhost) to access the TCP/IP server on the local computer, regardless of its actual address on the network. This option is useful for local tests; however, you are not able to access the data server from remote computers using this configuration.
- Send Period field:
Type a value to specify the send period (in milliseconds) used to
exchange data between the server and the Thin Client stations. It
means that the Thin Client will send a package with the new tag
values to the server every n
millisecond(s).
The Send Period of the server is configured in the project settings (Communication on the Project tab of the ribbon). The default value is 1000 (milliseconds). You can set a lower value in this field to increase the update rate between the server and the Thin Clients. Doing so may result in higher traffic in the network (the network will be accessed more frequently) if the tags are changing continuously (faster than 1 second).
- Disable Remote Client Commands checkbox: Click to enable this box, to prevent a remote client from issuing commands from your Thin Client to your server. When this option is enabled, the Thin Client can read data from the server, but cannot send data (tag values, set-points) to the data server. In this case, the Thin Client station becomes a Read Only station.
- Enable ToolTips checkbox: Click to enable this box, to display the ToolTips configured on the objects of the screens when viewing them on the Thin Client (web browser).
- Auto Screen
Scaling checkbox: Click to enable this box, to automatically
scale screens displayed in a web browser window. Using this option,
the screen fits to the size of the web browser window, regardless
of its resolution.
Note: The Auto Screen Scaling option is not valid for Web browsers running under Windows CE operating systems.
- Enable File Compression checkbox: Click to enable this box to compress the files stored on the Web sub-folder of your project folder. This option is useful for reducing download time, particularly if you have a slow connection between your server and the Thin Client.
- Log (Enable checkbox and FileName text field): Click to enable the checkbox, and type a file name into the text field to generate a log file on the Thin Client station. You can use this log file for debugging purposes.
- Virtual Keyboard:
When this option is checked, the Virtual
Keyboard is enabled for your project running Thin Clients. The
keyboard allows the user to enter data during runtime on
touchscreen panels — that is, without typing on a physical
keyboard. For example, a Text object with the
Text Data Link
animation applied and the Input
Enabled option checked.
You can establish a default configuration for the virtual keyboard:
- Default: Select the default keyboard type to be used in your project, when no keyboard type is specified by the calling object or function.
- Scale: Using this option, you can shrink or enlarge the keyboard to fit the size of the target display. A value of 100% represents the default size of each keyboard type.
- Show Hint checkbox and field: When this option is checked, a hint is displayed in the title bar of the keyboard. For objects, the hint is configured in the Object Properties dialog. Otherwise, enter a string or string Tag in the Show Hint field to serve as a defaut hint.
- Show Min/Max
Fields option: When this option is checked, the minimum and
maximum allowed values are displayed at the bottom of the keyboard.
For objects, these values are configured in the
Object Properties dialog.
Otherwise, the Min and Max
properties of the associated Tag are used by default.
Note: The Min and Max fields are displayed only on the Keypad keyboard type, and only when the associated Tag is defined as Integer or Real. If Min is greater than Max, then input will be disabled. If Min/Max configured on the object is different from Min/Max configured in the Tag properties, then your project will attempt to scale the input accordingly.
IP Security Settings
IP Security button: Click this button to open the IP Security dialog.

Use the parameters on this dialog to specify the range of IP addresses for the computers that are allowed to access your project as Thin Clients. This option is useful when you can control the IP Address of the Thin Client computers allowed to connect to the Web server.
Click the Enable checkbox, and when the Edit pane parameters become active, type IP addesses in the From and To fields to specify the IP address range. Use the Add and Remove buttons to move the IP addresses into the IP Address Range list. When a Thin Client attempts to connect to the server, it checks for an IP address for the Thin Client station that is within any range configured in the IP Security dialog. If one is not found, the server refuses the connection request from the Thin Client station.
[TCP]
UseWebIPSecurity=1
Advanced Settings
Advanced button: Click this button to open a dialog where you can edit the Advanced Web settings. For most cases, these settings do not need to be modified. However, depending on the architecture used in your project, you have the flexibility to configure advanced settings.
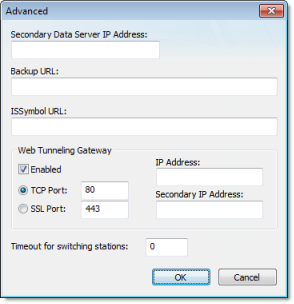
- Secondary Data Server IP Address field: Type the IP address (or host name) of the secondary data server station. The data server station is the computer or device where the TCP/IP server module of IWS is running. This field must be filled when you are using redundant data servers from the Thin Clients. If the primary data server fails, the Thin Client will attempt to connect to the secondary data server automatically.
- BackUp URL field: Type the URL where the Web files are stored (files from the Web sub-folder of your project folder). This URL is used to download the files from the secondary Web server when the primary Web server is not available.
- ISSymbol URL
field: When the Thin Client connects to the server, it attempts to
load the ISSymbol control. If
ISSymbol is not registered in the local computer (Thin Client), the
browser will attempt to download it from the URL specified in this
field. The default URL is a web site where InduSoft keeps the most updated
version of ISSymbol available for download. You may need to
configure a different location, especially when the Thin Client
computer is not connected to the internet. The ISSymbolVM.cab (stored in the \BIN sub-folder of IWS) must be available in the
URL configured in this field.
Tip: When the Thin Client stations do not have access to the internet, it is recommended that the ISSymbolVM.cab file be made available at the Web server station, and that the URL be configured for it in this field.Note: Web browsers running under the Windows CE operating system are not able to download ISSymbol control (ISSymbolCE.ocx) automatically from a remote location. ISSymbolCE.ocx must be manually registered in the Windows CE device to be used as a Thin Client.
- Web Tunneling Gateway checkbox: Check this option to enable the Web Tunneling Gateway. Depending on the architecture of your project, you may need to use the Web Tunneling Gateway to route the Thin Client computers to the data server.
- TCP Port: Select this option when using HTTP with the Web server of Microsoft IIS. You can specify the TCP port used by your HTTP Web server ( 80 is the default TCP port for HTTP protocol).
- SSL Port: Select this option when using SSL (Secure Socket Layer) with the Microsoft IIS Web server. You can specify the TCP port used by your HTTPS Web server ( 443 is the default TCP port for HTTPS protocol).
- IP Address: IP address of the Web server computer where the Web Tunneling Gateway is running. This must be the IP address of the Web server accessible from the Thin Client station(s).
- Secondary IP
Address: IP address of the Web server computer where the
secondary Web Tunneling Gateway is running. This must be the IP
address of the secondary Web server accessible from the Thin Client
station(s). This field must be configured when you are using
redundant Web servers.
Tip: Most of the Web settings can be modified dynamically by the SetWebConfig function. It is especially useful when you want to create a project just once, and make sure that the Web settings are automatically configured when you run your project on different stations with different IP Addresses.